This is an old revision of the document!
Archiving Workflow
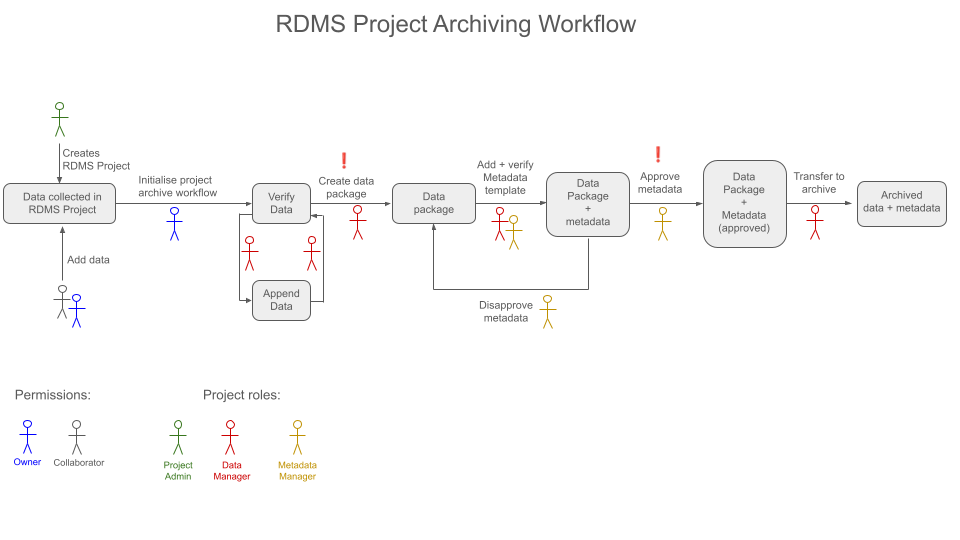
The archiving workflow is the process of creating a bundled dataset, called data package in the RDMS, from a RDMS Project in a structured way. The archived dataset (data package) is then ready for the publication workflow (which is the process of publishing the metadata to the outside world to comply with the Open Science framework). Currently, the publication workflow is under development.
During the archiving process, there will be three different roles that will be active at different times.
Owner/Admin: This role is responsible for assigning the data manager and metadata manager roles as well as starting the archiving process. By default, the creator of the RDMS project is its admin, but the role can also assigned to other users (see below for info about assigning roles). Best practice is to assign this role to the project supervisor.
Data Manager: This role is responsible for verifying that the data sent to the archive is complete and uncorrupted, and giving the final approval of the archive. Best practice is to assign this role to the person(s) who are most familiar with the data.
Metadata Manager: This role is responsible for verifying and completing the metadata information related to the archive. Best practice is to assign this role to the person(s) who know the origin and scope of the data.
A single user can have any number of these roles assigned to them, and/or multiple users can have different roles and work at different stages of the archiving process.
This section will furthermore explains, the workflow starting from an already existing RDMS project including its different steps and the active roles. It will also elaborate more on the content of the created datapackage.
Steps of the Archiving Workflow
This section explains in details the different steps of the archiving workflow, including the requirements that need to be fulfilled to start it. An example project will be used to guide step-wise through the whole workflow.
Prerequisites
Existing Project
To start an archiving workflow, the first prerequisite is that there is an already existing RDMS Project which also contains some data from which the workflow can be started.
Using the Web Interface
Using the archiving workflow requires using the RDMS web interface. It is not possible to execute the workflow via CLI, e.g. iCommands.
Correct User Privileges
The RDMS account of the project admin needs the correct, elevated permissions to be able to assign user roles and start the archiving workflow. If you lack these privileges, please contact rdms-support@rug.nl.
For the other involved roles, metadata and data manager, no special privileges are needed, but the respective role should have read/write permission in the project.
Assigning Roles
Before starting an archiving workflow, it is is recommended to assign the desired workflow roles for the RDMS Project. The can be done by the owner of the project via the data management tab.
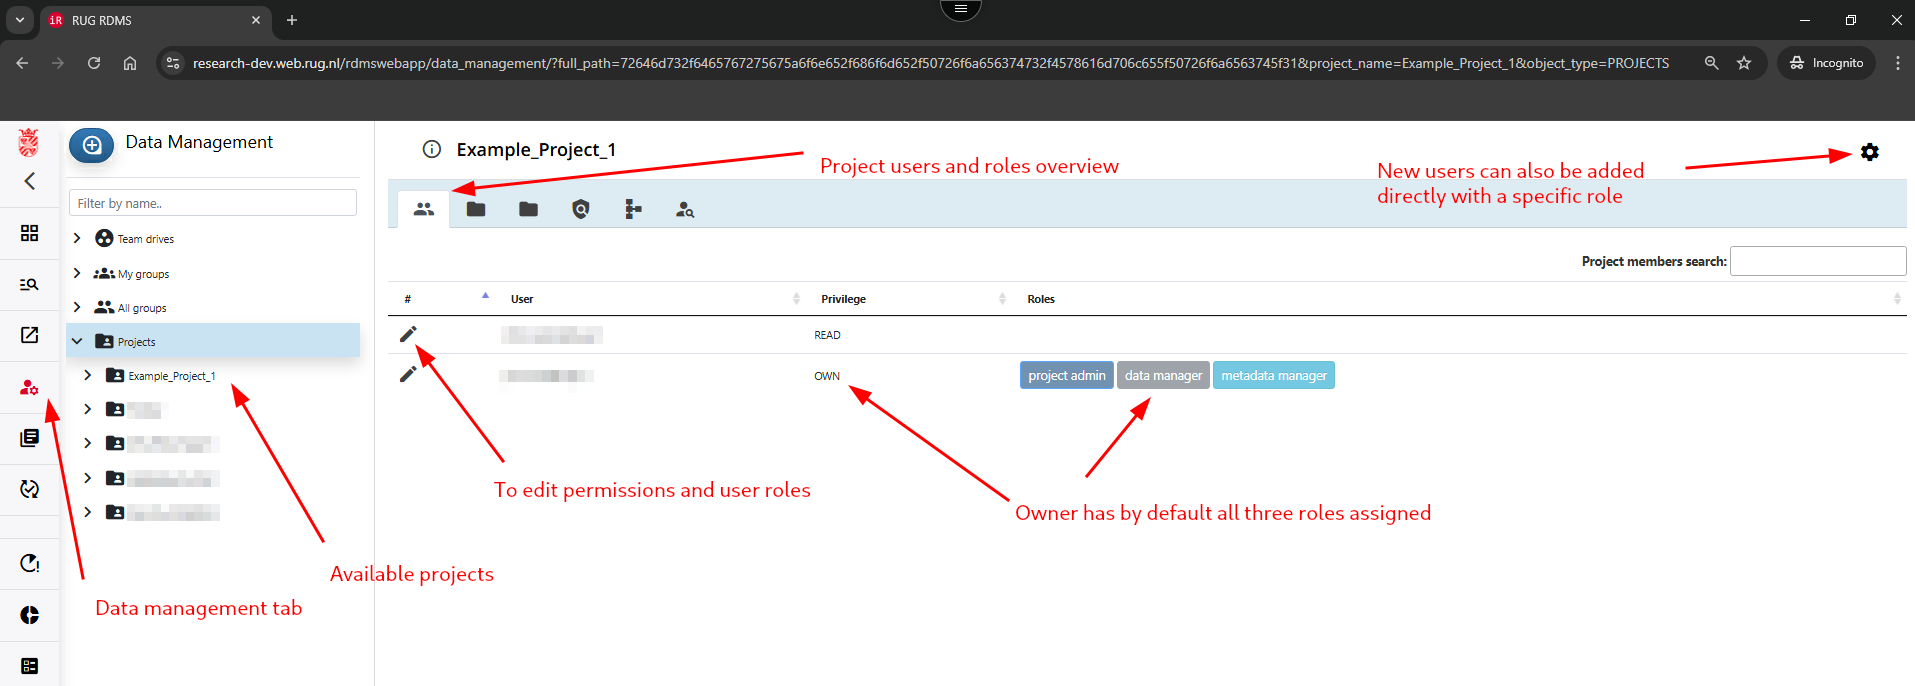
By clicking on pencil symbol next to the name of an existing project member, their project permissions as well as project roles can be adjusted (see best practices below).

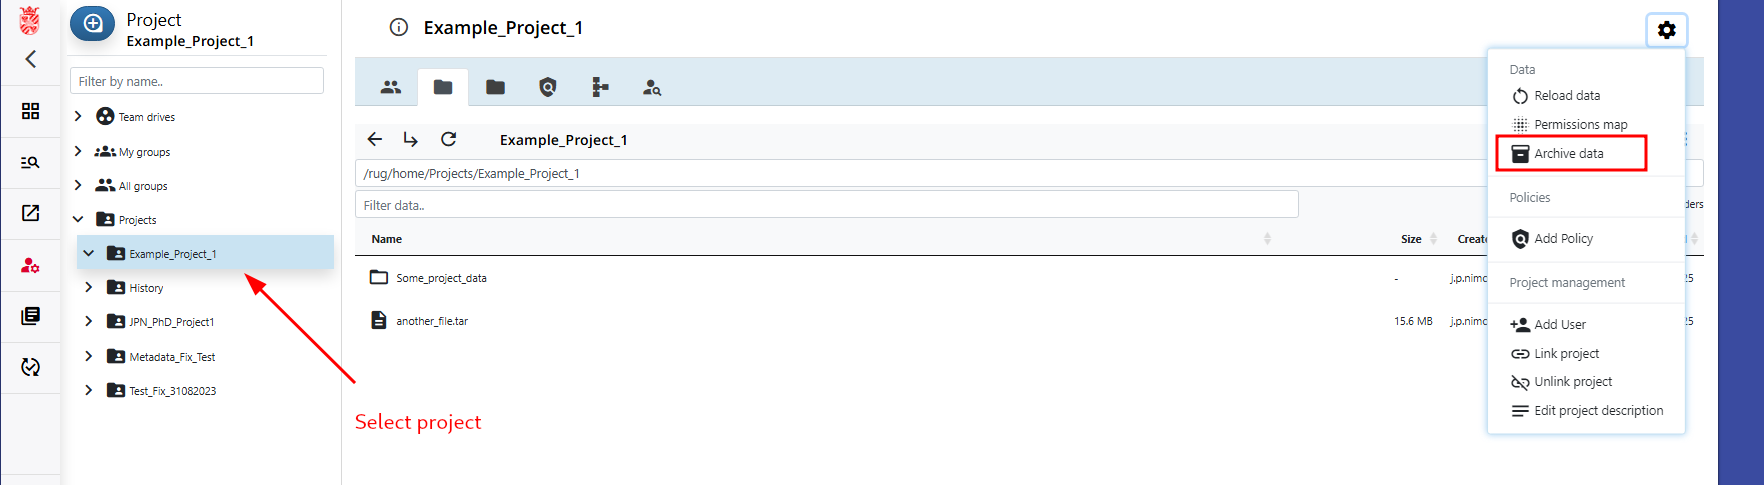
After the roles are assigned, the archiving workflow can continue, starting with the initialization of a new workflow by the project admin.
Notes:
- To assign a user as project admin, select 'own' permission. Please note that the user needs elevated privileges to be able to act as project admin. In cases where this is needed, please contact rdms-supprt@rug.nl.
- To assign a user role, the user need to have at least 'read' permission in the project.
- Also see the section about best practices with some info about how these roles could be assigned in a smart way.
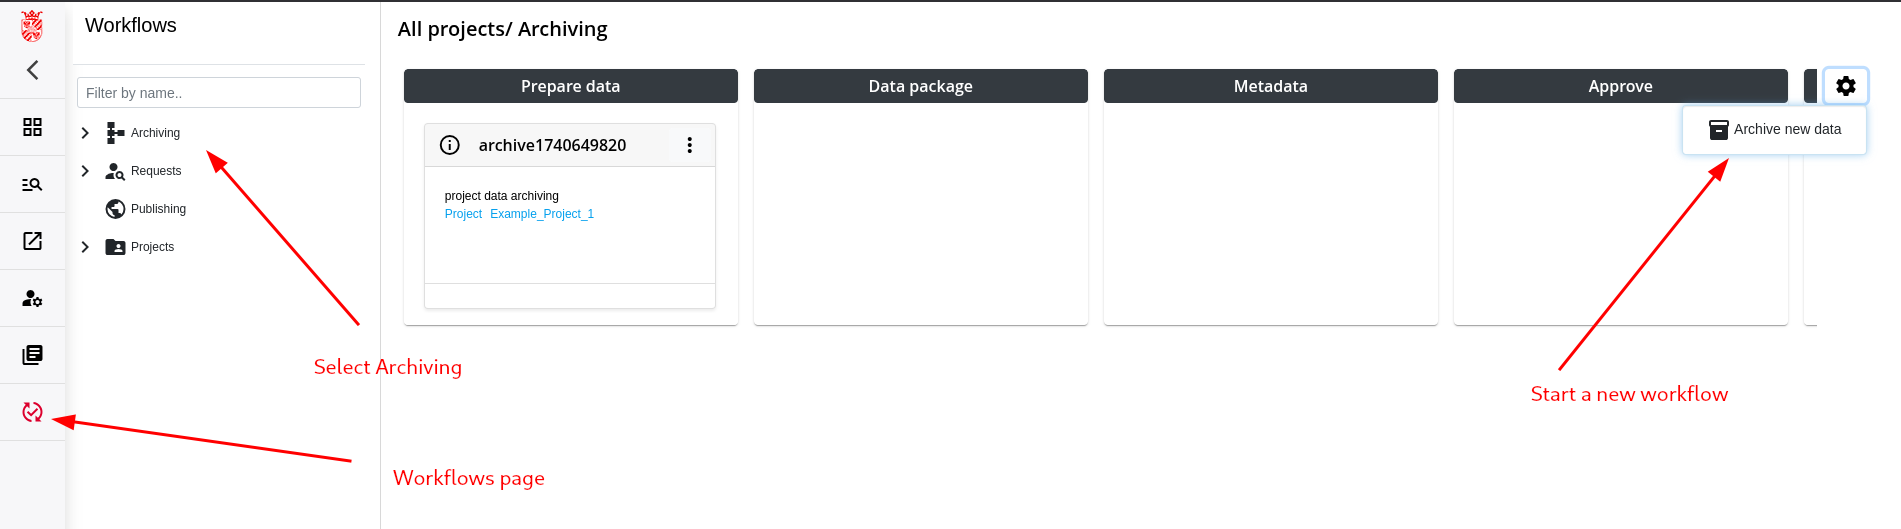
Step 1: Initialize a new Archiving Workflow
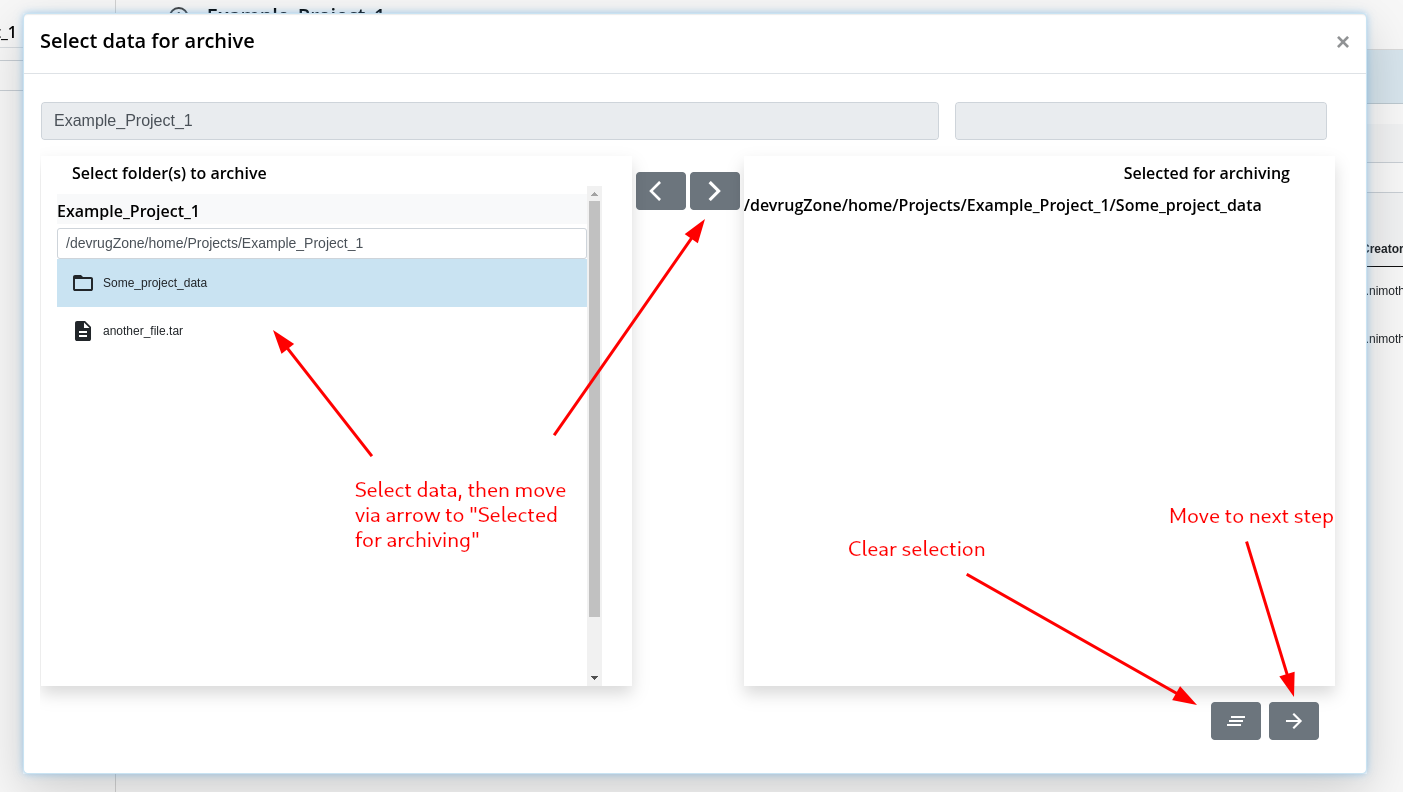
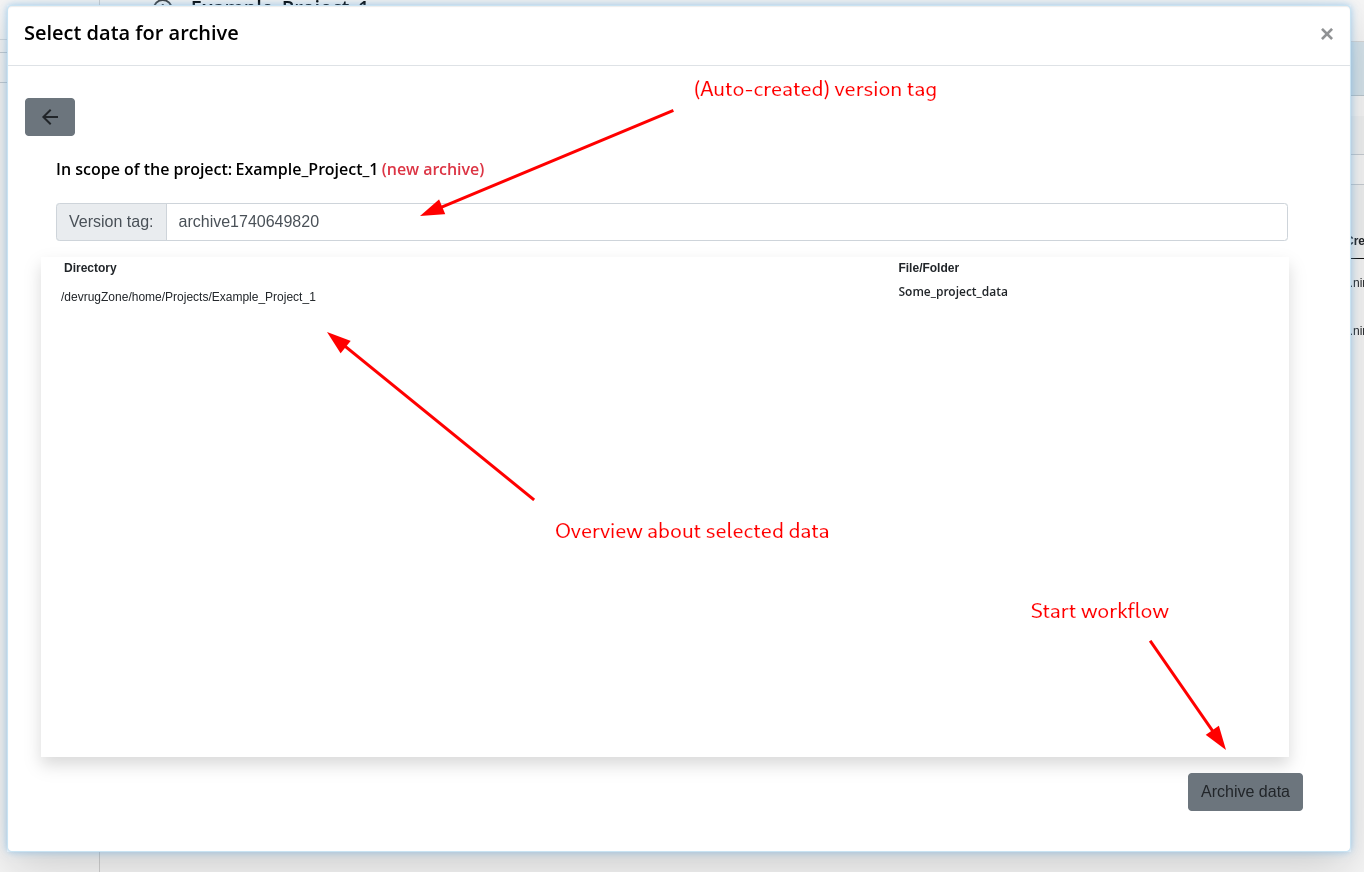
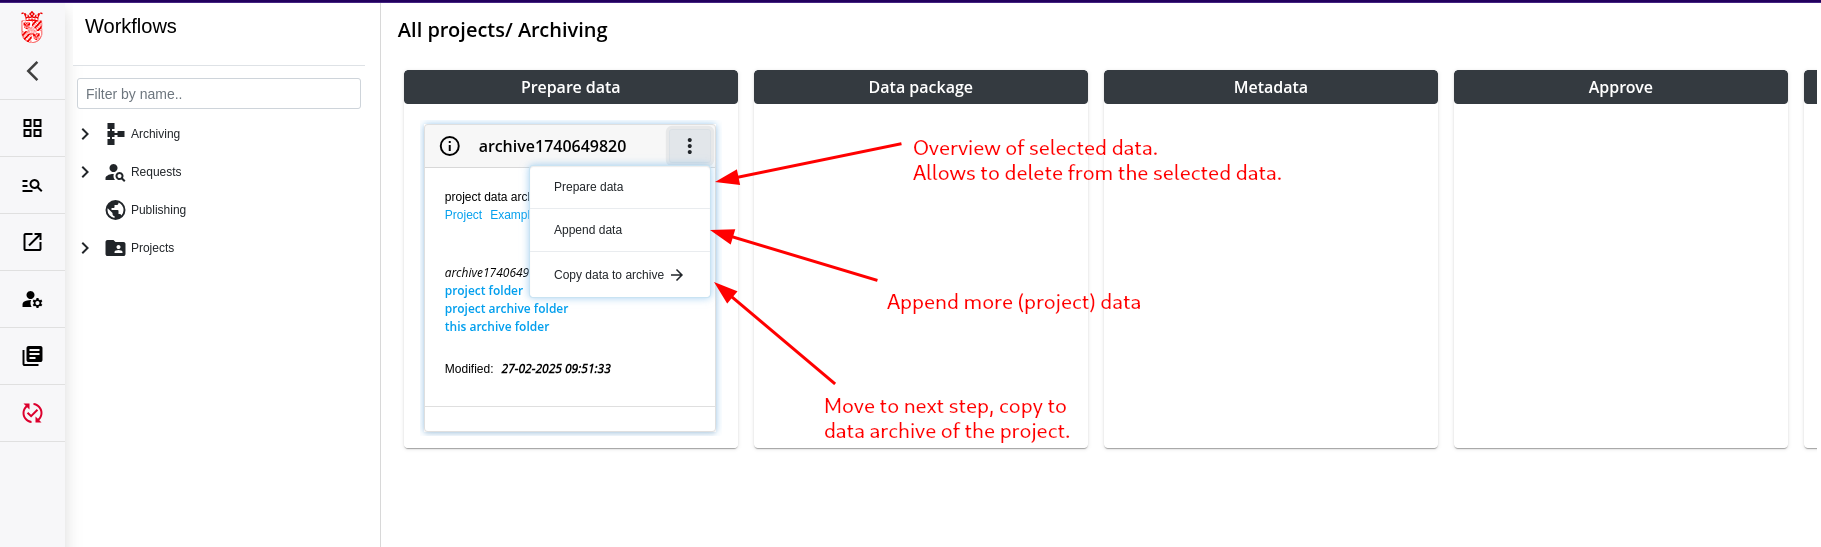
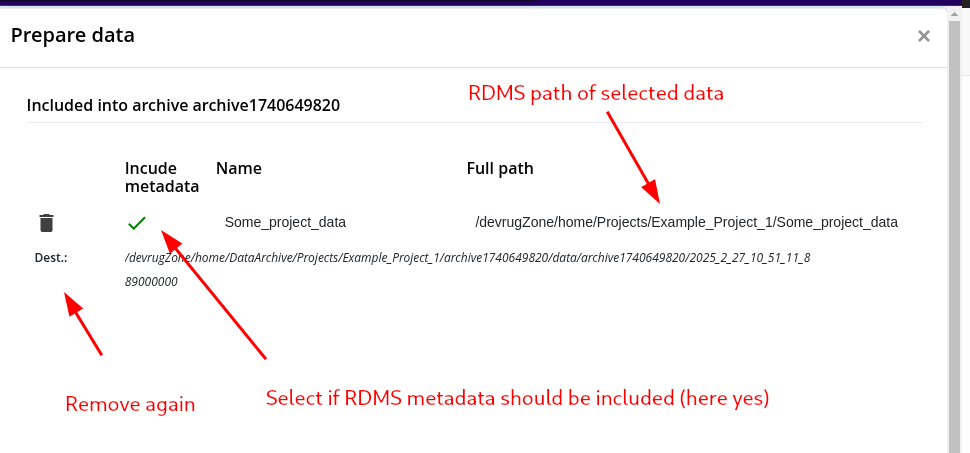
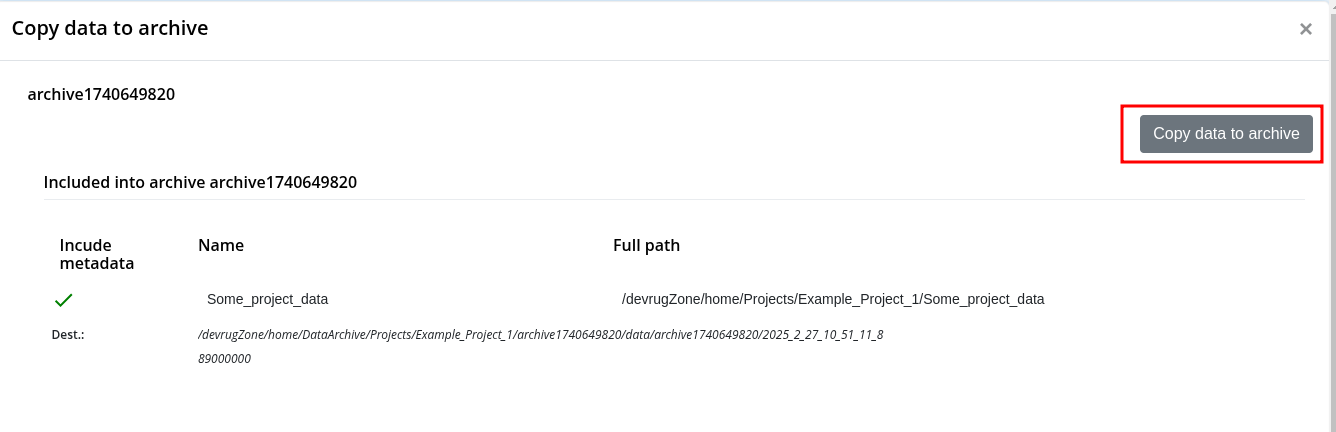
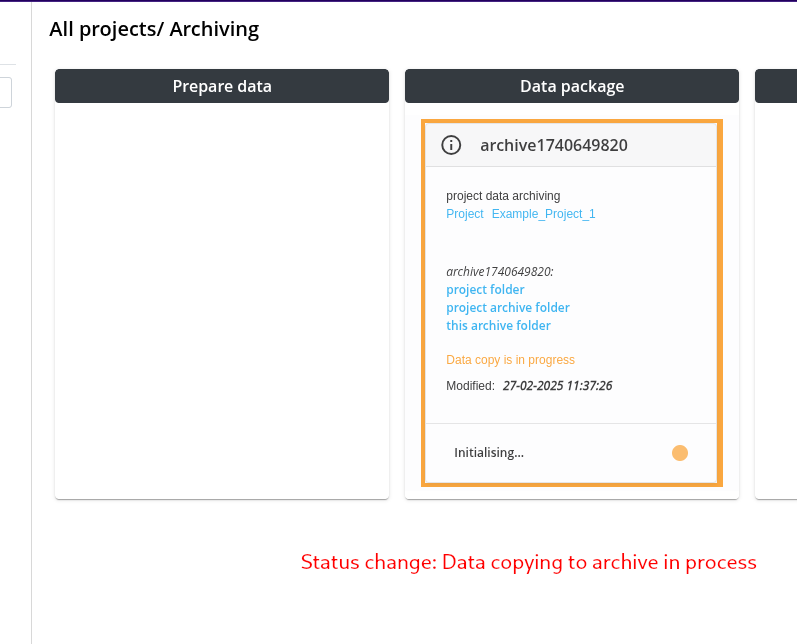
Step 2: Check Data and copy to Project Archive
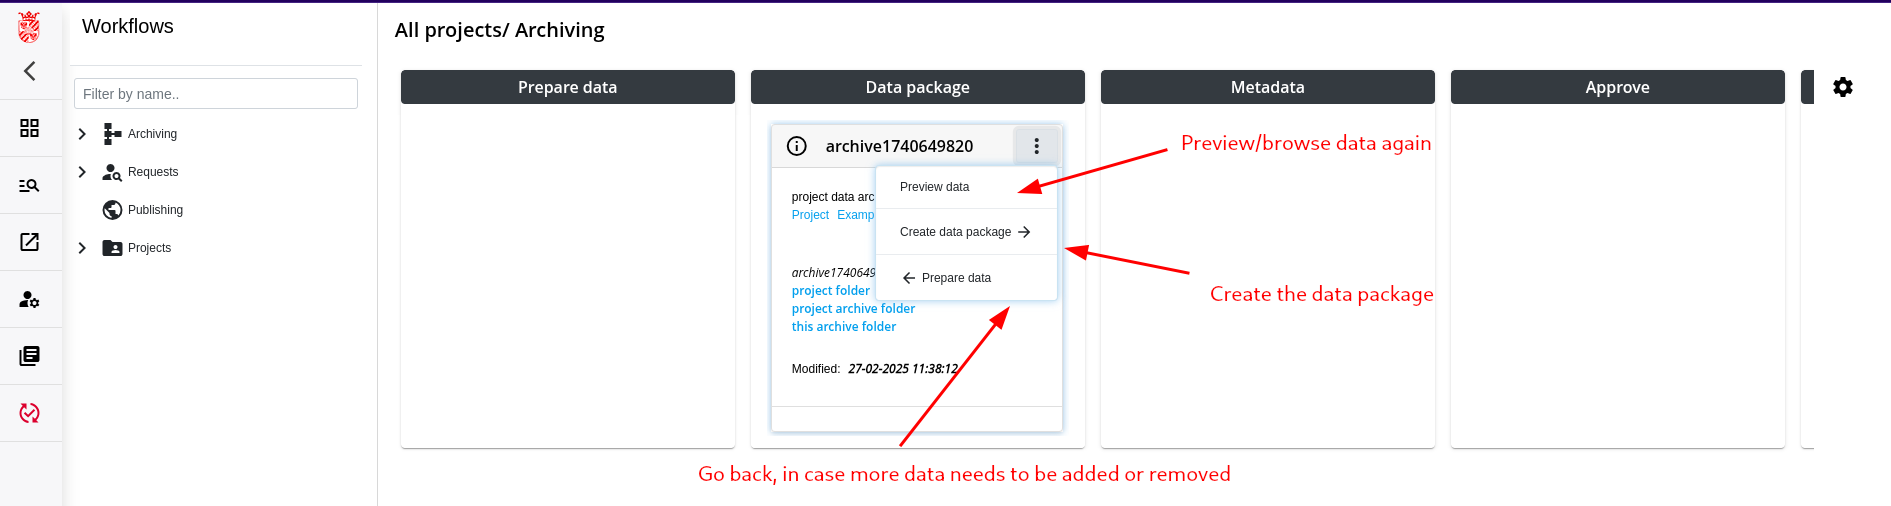
Step 4: Creation of the Data Package

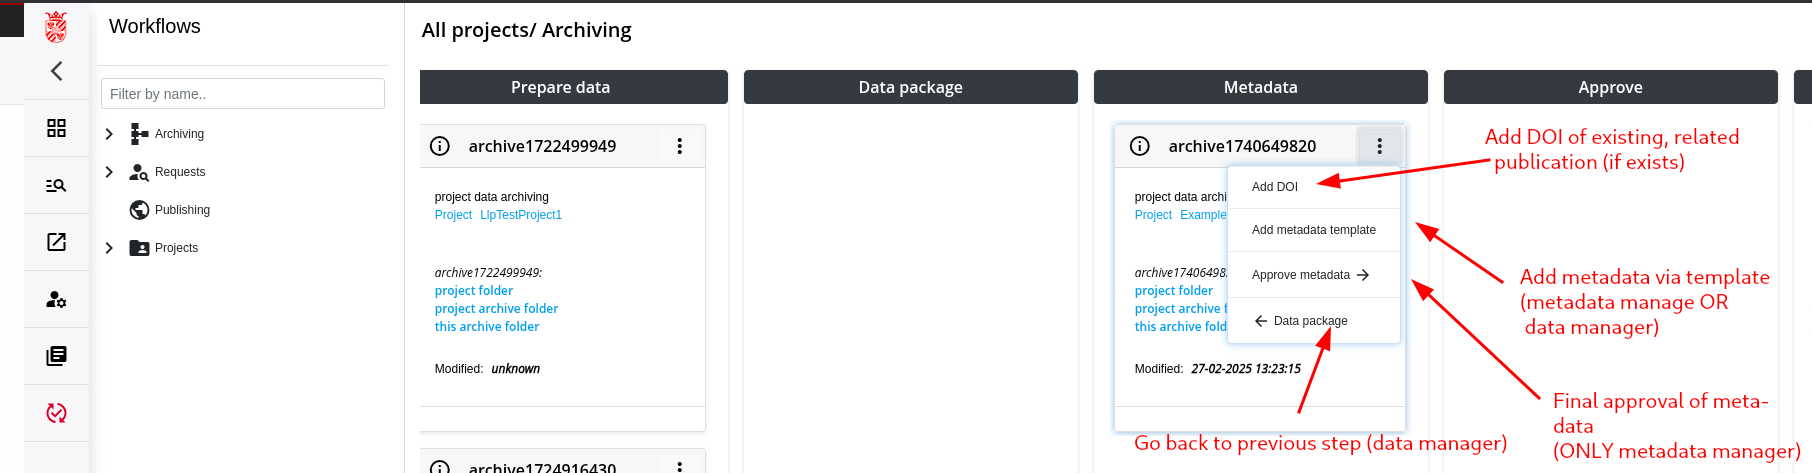
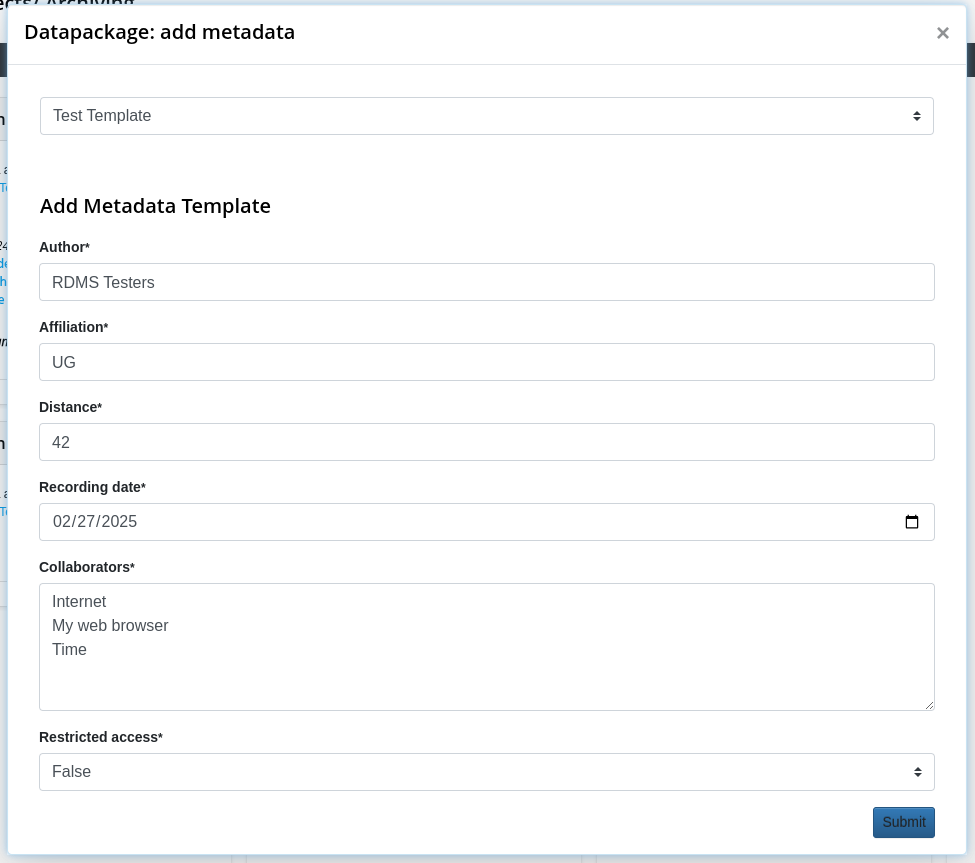
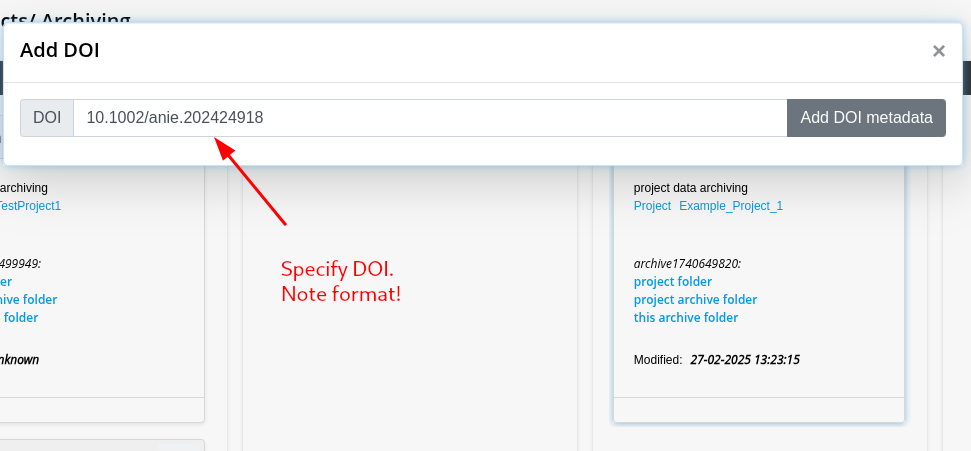
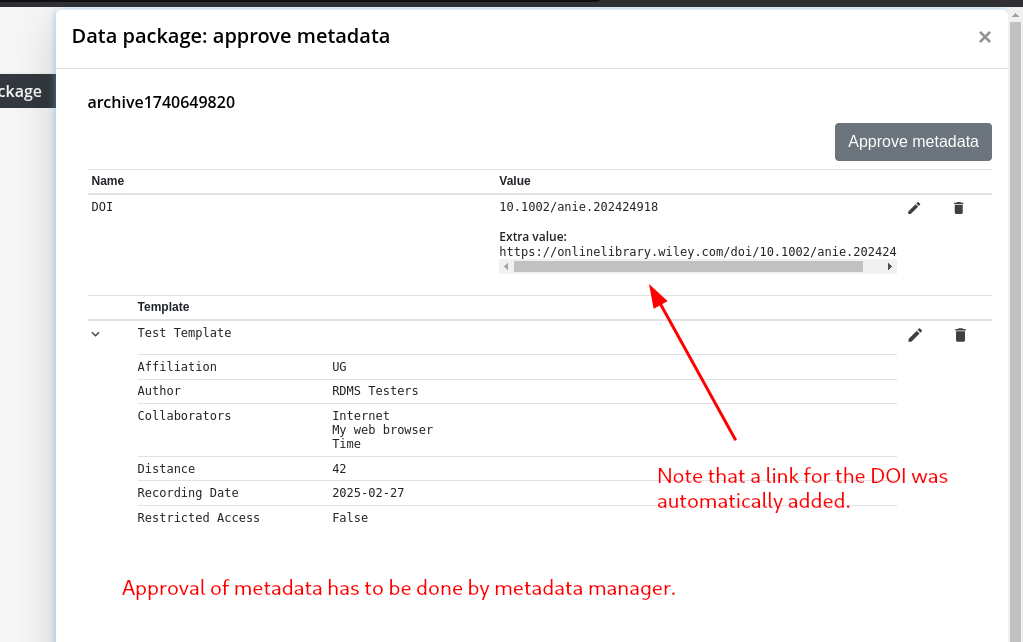
Step 5: Add/Approve Metadata
Step 6: Move Data Package to Archive


The Data Package and its Content
At the end of the archiving workflow, a so called data package is created. This is the name in the RDMS for a data set with a specific structure that resulted from the archiving workflow.
In this section, we will have a more detailed look at the data package and explain its internal structure.
In general, the following applies:
- The created data package is always in a structured
*.tarformat which is a standard format for bundling data that can be opened with different tools. - Inside the tar, there are different subfolders for the selected and archived data as well as the information about the metadata that was available for the included data in a separate folder in
*.jsonformat. The second folder with the metadata info is only created if it was selected during the archiving workflow (step 2) that RDMS metadata should be included in the created data package. Otherwise this folder does not exist.
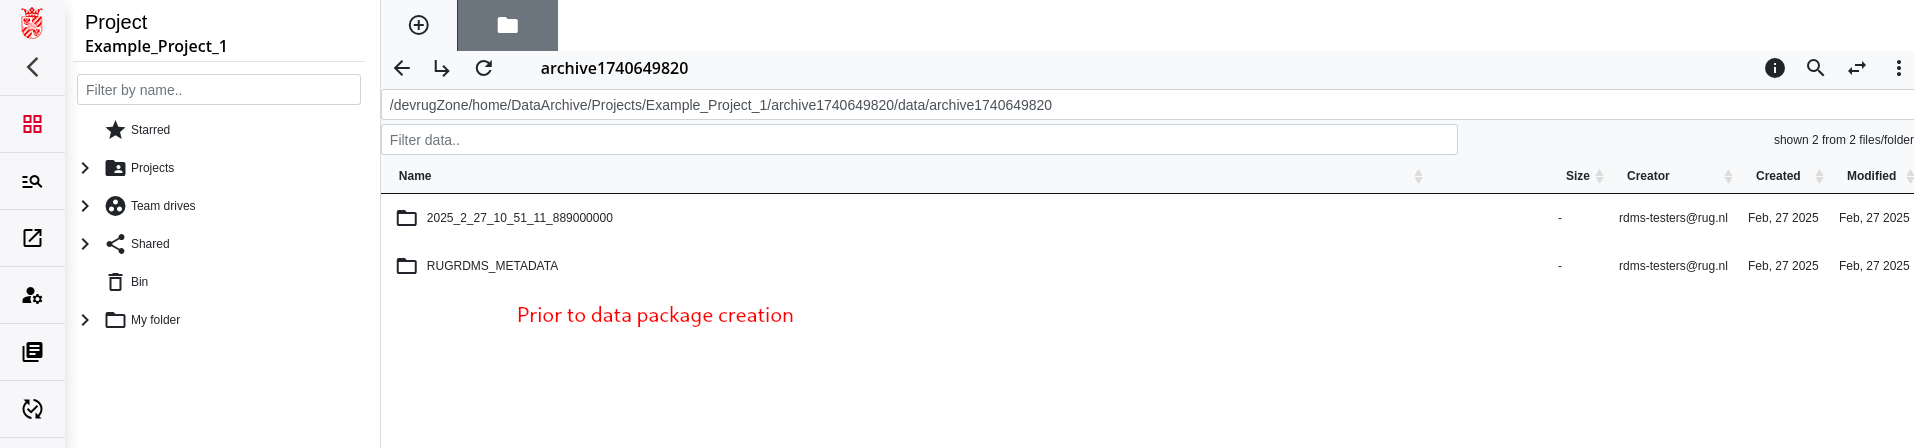
In our case where we selected metadata to be included and where we had only one data folder selected to be included in the archive, our archive has in the end the following structure after being downloaded and extracted locally:
# This is the general structure of the created datapackge after being extracted

archive1740649820/                            # This is the name (version tag) of the archive that we specified during the workflow
├── 2025_2_27_10_51_11_889000000              # Subfolder that contains the selected (meta)data
│   └── Some_project_data                     # This is the folder from which we started the workflow. Below it is content (not completely shown)
│       └── LA-187-1
└── RUGRDMS_METADATA                          # As we selected in the example to have metadata included, we get this folder as well
    └── 1Some_project_data.metadata.json      # This is the available metadata for the "Some_project_data" folder in json format.
If we have a look at the json file with the metadata, we see that it contains info about the metadata that was available for the selected data. The following is a snippet of that file that shows how this info is exported and included in the data package.
[
  {
    "l_header": "# DO NOT EDIT. Automatically generated for archiving.",
    "l_className": "rugirodsrest.RugIRODSRestArchiveMetaToStore",
    "l_toplevel_path": "/devrugZone/home/Projects/Example_Project_1/Some_project_data",
    "l_objectType": "NORMAL",
    "l_objectFullPath": "/devrugZone/home/Projects/Example_Project_1/Some_project_data",
    "l_symlink_destination": "",
    "l_metaDataList": [
      {
        "metadataDomain": "COLLECTION",
        "domainObjectId": "619037",
        "domainObjectUniqueName": "/devrugZone/home/Projects/Example_Project_1/Some_project_data",
        "avuId": 620497,
        "size": 0,
        "createdAt": "Feb 26, 2025 3:28:02 PM",
        "modifiedAt": "Feb 26, 2025 4:27:06 PM",
        "avuAttribute": "Origin",
        "avuValue": "RDMS",
        "avuUnit": "",
        "count": 1,
        "lastResult": true,
        "totalRecords": 0
      },
      {
        "metadataDomain": "COLLECTION",
        "domainObjectId": "619037",
        "domainObjectUniqueName": "/devrugZone/home/Projects/Example_Project_1/Some_project_data",
        "avuId": 290732,
        "size": 0,
        "createdAt": "Feb 26, 2025 3:28:02 PM",
        "modifiedAt": "Feb 26, 2025 4:27:06 PM",
        "avuAttribute": "Type",
        "avuValue": "Testing",
        "avuUnit": "",
        "count": 2,
        "lastResult": true,
        "totalRecords": 0
      }
    ]
  },
[...]
Best Practices
This section elaborates on how the project and its roles can be setup to spread the different tasks in the workflow efficiently. It will also give some more info about best practices in the context of the project archiving workflow.
In general, these is how the roles could be assigned in a project:
- Project Admin: This role should be taken by the project lead. This is the person that manages the project (permissions, roles, etc.) and is also the only one that can start the workflow. Other than that, this roles does not need to take additional steps in the workflow.
- Data Manager: As this role verifies that all data that should be archived is included during the workflow, it makes sense to assign this role to the person that is most familiar with the data. In the case of a simple research project that could be the main researcher that produces that data. Of course, it is also possibly to assign multiple data managers if the project needs multiple people to check that the data is correct, but one has to take the lead in the end to confirm the correctness and move the workflow to the next step. The data manager can also add metadata in the following step which also makes sense if this role is assigned to the main researchers of the project. They likely now best what should be included as metadata.
- Metadata Manager: The main role of the metadata manager is to confirm that the metadata that was entered is correct. It makes sense to assign this role to another user, not the same that added the metadata. For a project/research group that has staff that takes care of the data management, it makes sense to assign this role to that person. Moreover, it is also possible that the metadata manager does both, adding the metadata and also approving it.
As already mentioned above, it is also possible to give the data and metadata manager role to the same person. In this cases, the whole workflow, except the initialization, can be done by a single user. This is also a valid possibility, but it should be mentioned that the “checks and balanced” that the archiving workflow introduces via its different roles is then minimized.