Data Safety and Integrity
Compared to other UG storage solutions, the RDMS archive, is unique as it provides you with different means to check the integrity of the stored data.
This section will explain the key concepts in the RDMS related to long-term storage and how you can verify your data's integrity your self. In short, the key concepts are:
- Data Replication: Data in the RDMS is stored at two different physical locations. The versions at both physical locations are called replicas, as the file is identical, meaning replicated, in both locations.
- Checksum: A checksum is a unique value that is generated by running a checksum function on certain data. The uniqueness of these values allow to check the integrity of the data.
Data Replication
As mentioned in the introduction, all data that is stored in the RDMS is automatically replicated to two separate physical locations. While the replication does not guarantee the integrity of the data, since corrupted data will also be replicated, it is a safeguard mechanism in case of hardware failure or damage to a data center. Because the data exists in two independent locations, the likelihood of both locations being affected is minimal.
Note: The replication in the RDMS operates at the hardware level. As a user, this is not directly visible with the tools discussed in this wiki section. For example, the iCommands CLI can be used to check data integrity and, as will be described below, also shows the status of the replica, but will still show only one replica.
Checking Data Integrity
This section explains how you can verify the integrity of your data in the RDMS yourself: How the RDMS uses checksums to verify integrity, different replica statuses and what they mean and how you can use this info to check your data, either using the RDMS web interface or using the iCommands CLI tool.
Checksums in the RDMS
One of the unique features of the RDMS is that it is not just a simple storage solution, it also has a database running in the background (iCAT catalog). This database allows user to annotate data with user-defined metadata, but it also functions to store other information about the data in the system.
In the RDMS, a checksum is stored for every file. By default, this happens automatically upon data ingestion via delayed rules. Checksum calculation can also be enforced manually when using the iCommands. Both methods ensure that data integrity is verifiable.
Data Replica Status
Every file (not folder) in the RDMS also has a replica status associated with it. This replica status gets automatically assigned when the data enters the system. The replica status definitions result from iRODS the data management system that is the backbone of the RDMS. As of now, iRODS knows five different replica statuse of which four are used:
| Numeric Value | Symbolic Value | Name | Definition |
|---|---|---|---|
| 0 | X | stale | A stale replica is no longer marked as good. This usually result from another replica of the same file being written to more recently. A stale file does not necessarily mean that the data is corrupted. |
| 1 | & | good | A good replica is the desired state. It marks that the data as well as associated metadata are correctly written to the system and understood to have arrived in a good state. |
| 2 | ? | intermediate | An intermediate replica state usually happens during an active data transfer. In this state, the replica (file) can not be opened or otherwise written to, nor can it be renamed. |
| 3 | ? | read-locked | Currently unused state |
| 4 | ? | write-locked | A write-locked replica status also indicates that the file is currently locked (no read/write/rename) |
As seen in the above table, the replica status to aim for is the “good” replica status.
If you check your file statuses often, it is also not uncommon to see files in the intermediate state which usually happens if you are currently transferring the data that you are checking.
If on the other hand, your data is not actively written to by you and you see a file in either an intermediate or a locked state, this usually indicates a form of data corruption or the data not having arrived and been registered properly in the system.
This usually happens if your data transfer fails during active transfer, for example when the client or connection crashed. If you experience this, the data can't be used and the transfer should be re-attempted. As Replica in this state also often result in errors upon renewed transfers, please have a look at our Best Practices wiki section that explains in the Locked Files (HIERARCHY_ERROR) how you can recover from these cases.
For a stale replica, the situation can indicate corrupted data, but does not have to. In these cases, it is best to compare the registered checksums with the checksums of the original files if they still exist on the source. If they do not exist anymore, it is also possible to check that the files are okay by downloading them and checking locally if they have the content, etc. that they should have. Otherwise, if unsure, please get an in contact with rdms-support@rug.nl and we will look at your specific case.
Note: While not directly related to the replica status information, the size of the file that is visible in the RDMS can be also an indication if the data is good or somehow corrupted. If you see 0 byte size replica (files), this can be an indication of data not being good!
How to Check Your File's Checksum
iCommandsCLI: Use the command-line interface to verify file checksum.- Web interface: Checksum information is also visible via the RDMS web interface
The checksum that are stored in the RDMS are base64-encoded SHA256 checksums which is important to know when trying to reproduce the checksum in the RDMS locally (see below).
Note: If you use Windows, either via native WebDAV in MS File Explorer, Cyberduck, or WinSCP, the information about data checksums is not available. The same also applies for Mac users that use Cyberduck or Finder.
Via Command-Line Interface
The most convenient way to check the status and integrity of your data in the RDMS is via the iCommands command-line tool.
Checking Integrity during Data Ingestion
The commands that are used for uploading data to the RDMS, namely iput and irsync, both have an option to enforce checksum calculation and comparison via the additional -K flag. From the user documentation of these commands:
-K  verify checksum - calculate and verify the checksum on the data, both
       client-side and server-side, and store it in the catalog.
Which will compute the checksums for you locally, but also on the RDMS side. In the process the checksums are verified by the iCommands for you and also directly stored in the iCAT catalog/database.
Note: Even without using the -K flag, your uploaded data will get a checksum eventually due to the defined delayed rules, but using -K does that directly during data upload and also does the comparison for you.
Checking Integrity after Data Ingestion
For data that is already in the RDMS, there are different ways on how the integrity of the data can be checked.
Comparing Checksums manually
First, to see the status of a replica (file) in general, the ils command with the additional -L flag can be used which will have an output similar to:
$ ils -L test.json
  j.p.nimoth@r      0 rootResc;randy;pt0;mnt_nfsirods0         2629 2025-01-06.14:02 & test.json
    sha2:p4K6fv/5EVqpG1gugrXQrrk2Vqky72AVxcTDSW16W38=    generic    /mnt/nfsirods/home/j.p.nimoth@rug.nl/test.json
In the above example of the test.json file that output of the command shows us that the status of the file is good as seen by the & replica status next to the file name. Moreover, we can see that the base64-encoded sha256 checksum for this file is p4K6fv/5EVqpG1gugrXQrrk2Vqky72AVxcTDSW16W38=.
The good replica status already gives a good indication that the data is not corrupted. To be sure the checksum of the data can be also computed locally and then compare these to the one that you see in the RDMS.
For Linux operating system, checksums can be calculated locally via:
sha256sum <filename> | awk '{print $1}' | xxd -r -p | base64
which would compute for the shown example file:
$ sha256sum test.json | awk '{print $1}' | xxd -r -p | base64
p4K6fv/5EVqpG1gugrXQrrk2Vqky72AVxcTDSW16W38=
As can be seen, both checksums, the one registered in the RDMS and the one computed locally for the same file, are identical. This confirms that the file stored in the RDMS matches the originally uploaded version.
Tip: It is also possible to adjust the command a little so that it does not just calculate the checksum for a single file, but for all files in a folder. An example command to do so (assuming Bash shell):
for file in /path/to/folder/*; do
  if [ -f "$file" ]; then
    checksum=$(sha256sum $file | awk '{print $1}' | xxd -r -p | base64)
    echo "File: $(basename "$file"), Checksum: $checksum"
  fi
done
which will iterate over all files in the specified local folder and display the found file including the computed checksums. This info can then be used to compare to the data in the RDMS.
For Mac, the respective commands have to be slightly adjusted. To compute the checksum stored in the RDMS on Mac for a single file, you can use:
shasum -a 256 <filename> | awk '{print $1}' | xxd -r -p | base64
Or for all files in a certain folder:
for file in /path/to/folder/*; do
  if [ -f "$file" ]; then
    checksum=$(shasum -a 256 "$file" | awk '{print $1}' | xxd -r -p | base64)
    echo "File: $(basename "$file"), Checksum: $checksum"
  fi
done
For Windows operating system, checksums can be calculated locally via Powershell.
To compute the base64-encoded checksum that is used in the RDMS via Powershell for a single file, you can use:
[System.Convert]::ToBase64String((Get-FileHash -Algorithm SHA256 -Path "C:\path\to\file" ForEach-Object { [byte[]]($_.Hash -split '(..)' -ne '' | ForEach-Object { [Convert]::ToByte($_, 16) }) }))
Or to compute directly for all files in a certain directory:
Get-ChildItem -Path "C:\path\to\folder" -File | ForEach-Object {
    $file = $_.FullName
    $checksum = [System.Convert]::ToBase64String((Get-FileHash -Algorithm SHA256 -Path $file | ForEach-Object { [byte[]]($_.Hash -split '(..)' -ne '' | ForEach-Object { [Convert]::ToByte($_, 16) }) }))
    [PSCustomObject]@{
        FileName = $_.Name
        Checksum  = $checksum
    }
}
Note:
- The
sha2:entry in front of the checkum of the RDMS does only hint at the used checksum algorithm. It is not part of the checksum. This is important when comparing checksums seen in the system with the one computed locally!
For finding non-good replicas it is best to use the iquest command from the iCommands package. This command can query the RDMS database and as this also stores the replica statuses, you can use this to find all files that are marked as not good. An example query for that would be:
$ iquest "status: %s, name: %s/%s" "SELECT DATA_REPL_STATUS, COLL_NAME, DATA_NAME WHERE COLL_NAME LIKE '/rug/home/path/to/folder%' AND DATA_REPL_STATUS <> '1'"
which will check the location /rug/home/path/to/folder% including all its files and subdirectories including their files for files that have a replica status not equal to 1 (good state). As shown here, the command will output a list with the numeric status value of the found files, including their full RDMS path.
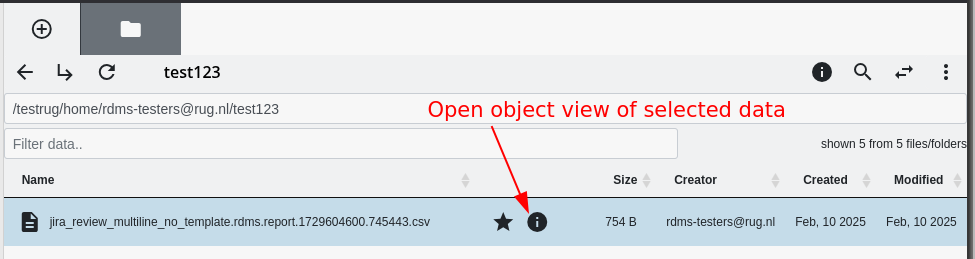
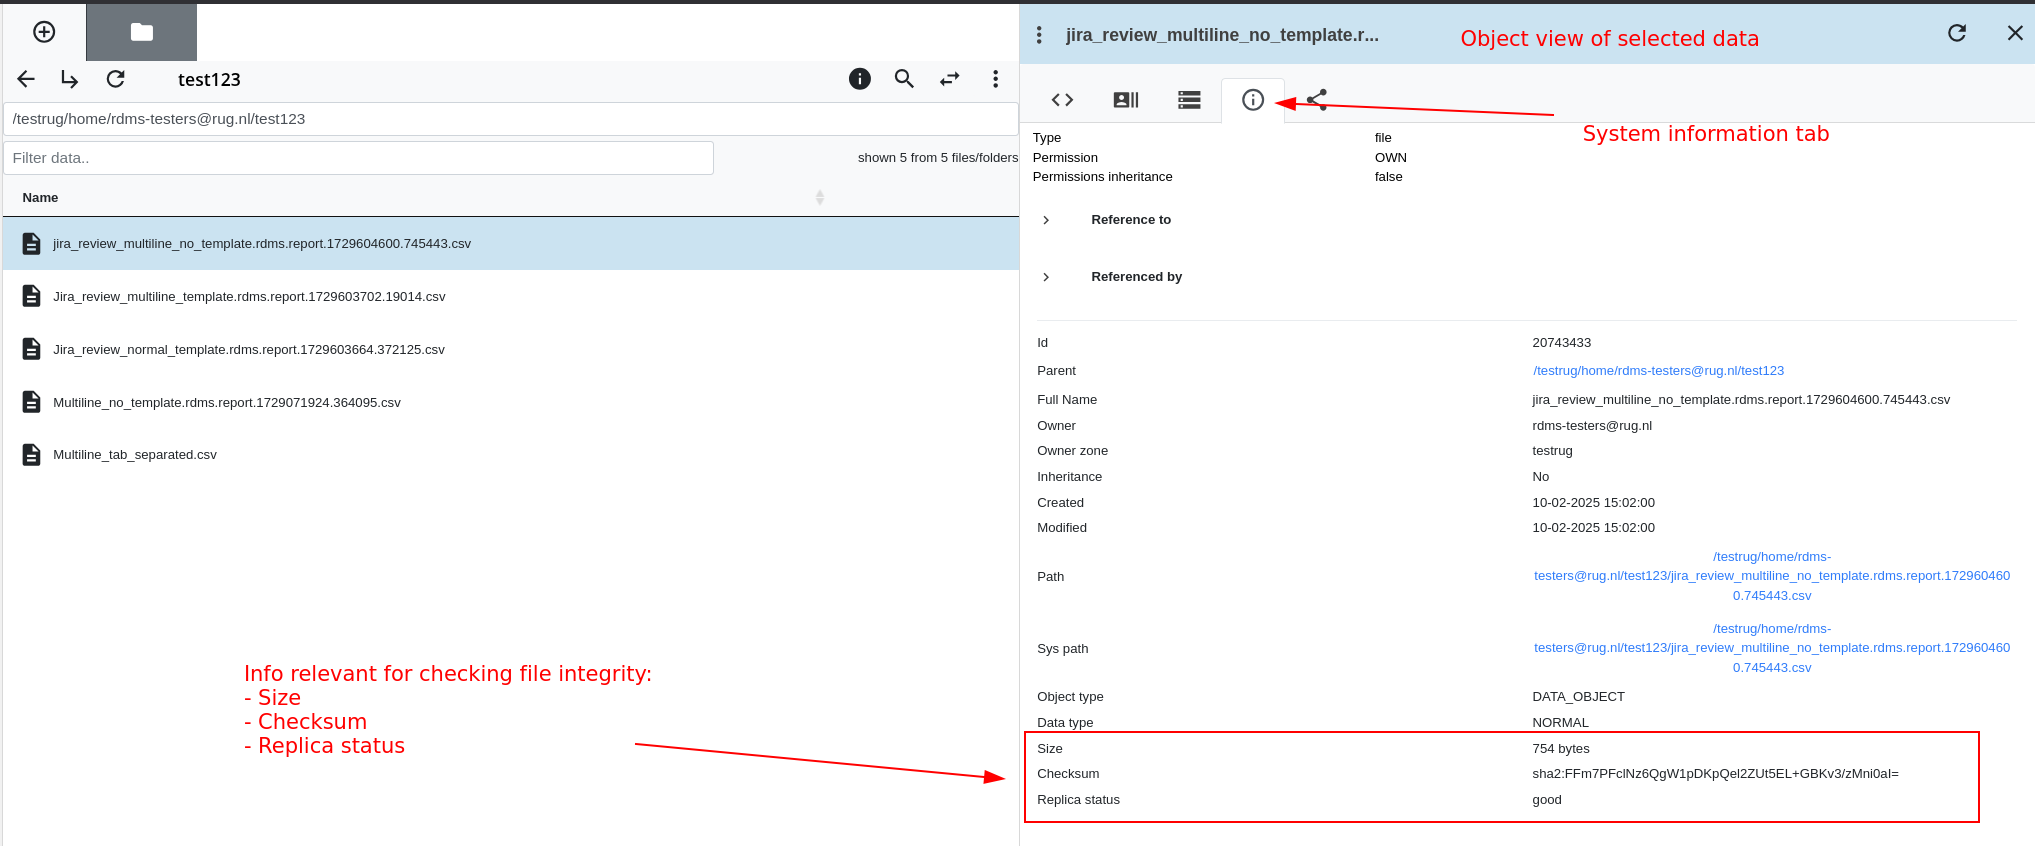
Via the Web Interface
The RDMS web interface also can be used to display the data checksum and the replica status, so that the integrity of the data can be confirmed.
This info is visible via the object view which can be opened via the i button when selecting a file in the interface.
In the object view, the relevant information are shown and can be used to check if the data is good.
Notes:
- While RDMS web interface displayes the checksum, you will still need to compute this value locally if you want to compare it. For that, please see the section above that described how to do this in different operating systems.
- Currently, the RDMS search does not support searching for files by a specific checksum or searching for all files with a specific replica status (e.g. finding all non-good replica statuses in a given RDMS location.) We are working on introducing this feature in the future.