Cyberduck is an open-source client for FTP, SFTP, and WebDAV available for macOS and Windows. It is pre-installed on the University Workspace (UWP) PCs and on the virtual UWP. If you work on a user-managed workplace or any other device you can download Cyberduck from its official website.

Cyberduck is a solution for transferring files to and from the RDMS. To manage data, metadata, users, and projects on the RDMS, you need to connect to the RDMS WebApp.
To access the Default zone, Cyberduck can connect to the RDMS using both the WebDAV and the native iRODS protocol. For the Sensitive Data (SD) zone, you should use the RDMS SD Cyberduck Profile. Instructions on how to configure Cyberduck for each case are provided below.
Notes:
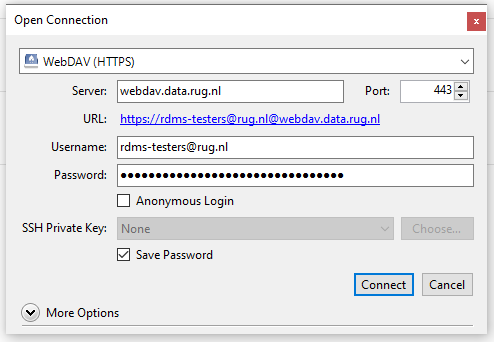
In order to access the RDMS via Cyberduck with the WebDAV protocol, click Open Connection, select the WebDAV (HTTPS) protocol, and configure the login credentials as follows:
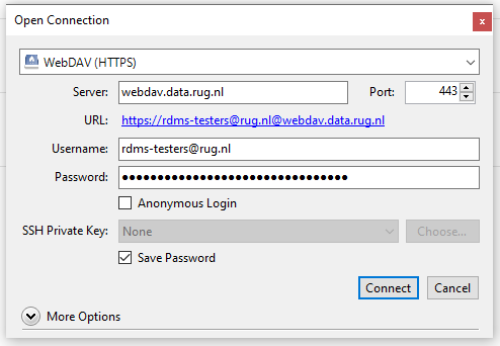
Note: If you experience issues with this, be sure that you specified your username in lowercase. The login to the RDMS is case sensitive!
Note: As of July 2026, there is a new iRODS native template for the Cyberduck profile. If you are using the old profile, Cyberduck will fail to connect and will ask for your credentials again. The profile in the Wiki is updated.
If you would like to use the native iRODS protocol for connecting Cyberduck to the RDMS, you can download the iRODS (RUG) Cyberduck profile directly by clicking on the link below or by copying the content to a text editor of your choice and then saving it as a *.cyberduckprofile file. Afterwards, double-click the downloaded/created *.cyberduckprofile file to install and add it to Cyberduck.
iRODS Cyberduck profile:
Click to display section
- RDMS.cyberduckprofile
<?xml version="1.0" encoding="UTF-8"?>
<!--
  ~ Copyright (c) 2002-2017 iterate GmbH. All rights reserved.
  ~ https://cyberduck.io/
  ~
  ~ This program is free software; you can redistribute it and/or modify
  ~ it under the terms of the GNU General Public License as published by
  ~ the Free Software Foundation; either version 2 of the License, or
  ~ (at your option) any later version.
  ~
  ~ This program is distributed in the hope that it will be useful,
  ~ but WITHOUT ANY WARRANTY; without even the implied warranty of
  ~ MERCHANTABILITY or FITNESS FOR A PARTICULAR PURPOSE.  See the
  ~ GNU General Public License for more details.
  -->

<!DOCTYPE plist PUBLIC "-//Apple//DTD PLIST 1.0//EN" "http://www.apple.com/DTDs/PropertyList-1.0.dtd">
<plist version="1.0">
    <dict>
        <!-- DO NOT CHANGE. This is the purpose of the profile-->
        <key>Protocol</key>
        <string>irods</string>

        <!-- Undocumented for CLI, the URI prefix, e.g., rug:// -->
        <key>Vendor</key>
        <string>rug</string>

        <!-- Name of the profile -->
        <key>Description</key>
        <string>RDMS (rug) 9.4.0+, iRODS 4.3.2+</string>

        <!-- Default name of bookmark -->
        <key>Default Nickname</key>
        <string>RDMS rug zone</string>

        <!-- iRODS hostname settings -->
        <key>Hostname Configurable</key>
        <false/>
        <key>Default Hostname</key>
        <string>store.data.rug.nl</string>

        <!-- iRODS port settings -->
        <key>Port Configurable</key>
        <false/>
        <key>Default Port</key>
        <string>1247</string>

        <!-- Default path to open -->
        <key>Default Path</key>
        <string>/rug/home</string>

        <!-- The zone of the iRODS server to connect to.  For backward -->
        <!-- compatibility, a root resource can be specified by appending -->
        <!-- ":<resource>" to the zone.  The specified resource is only -->
        <!-- used when uploading files.  Prefer setting "Destination -->
        <!-- Resource" under the "Properties" section. -->
        <key>Region</key>
        <string>rug</string>

        <!-- The authentication scheme used to establish a connection to -->
        <!-- an iRODS server.  Must be set to "native" or "pam_password". -->
        <!-- "standard" is an alias for "native". -->
        <key>Authorization</key>
        <string>pam_password</string>

        <!-- Advanced properties -->
        <key>Properties</key>
        <dict>
            <!-- The root resource to target when uploading files. -->
            <!-- DO NOT define this option unless needed. -->
            <!-- This option supersedes any resource defined by "Region". -->
            <key>Destination Resource</key>
            <string>rootResc</string>

            <!-- Controls whether deletion of an object permanently -->
            <!-- removes or moves it into the trash collection. -->
            <key>Delete Objects Permanently</key>
            <string>no</string>

            <!-- The size (in bytes) of a file that must be exceeded before -->
            <!-- using parallel transfer. -->
            <!-- The value must satisfy the range [1, 2^31-1]. -->
            <key>Parallel Transfer Threshold</key>
            <string>33554432</string>

            <!-- The number of iRODS connections used for parallel transfer -->
            <!-- of a single file.  Each transfer will use the specified -->
            <!-- number of iRODS connections. The value must satisfy the -->
            <!-- range [2, 10]. -->
            <key>Parallel Transfer Connections</key>
            <string>3</string>

            <!-- The buffer size (in bytes) used for parallel transfer of -->
            <!-- a single file. Applies to uploads and downloads.  The -->
            <!-- value must satisfy the range [1, 128MB]. -->
            <key>Parallel Transfer Buffer Size</key>
            <string>4194304</string>

            <!-- Secure communication options must be one of "CS_NEG_REQUIRE", -->
            <!-- "CS_NEG_DONT_CARE", or "CS_NEG_REFUSE". -->
            <!-- - CS_NEG_REQUIRE:   Demand TLS be used. -->
            <!-- - CS_NEG_DONT_CARE: Let the server decide if TLS is used. -->
            <!-- - CS_NEG_REFUSE:    Do not use TLS. -->
            <key>Client Server Negotiation</key>
            <string>CS_NEG_REQUIRE</string>

            <!-- TLS options, when enabled. -->
            <key>Encryption Algorithm</key>
            <string>AES-256-CBC</string>
            <key>Encryption Key Size</key>
            <string>32</string>
            <key>Encryption Salt Size</key>
            <string>8</string>
            <key>Encryption Hash Rounds</key>
            <string>16</string>
        </dict>
    </dict>
</plist>
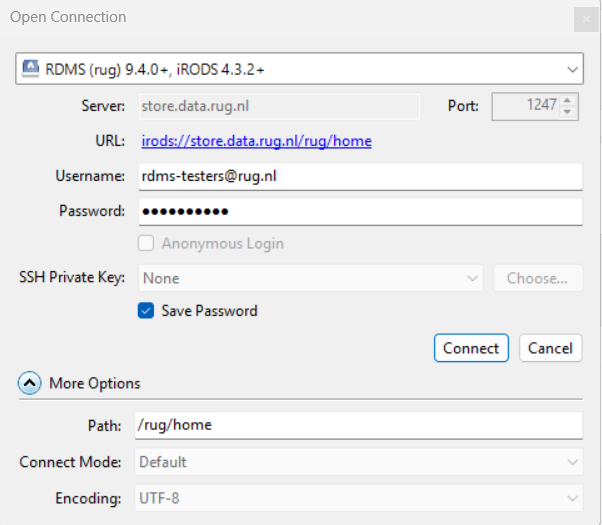
If everything went right, you will see the login screen below. It will connect you to the RDMS "rug" zone using the native iRODS protocol. Simply insert your UG email address (lowercase!) and associated password to connect to the system. It should have also created an editable bookmark for your connection.
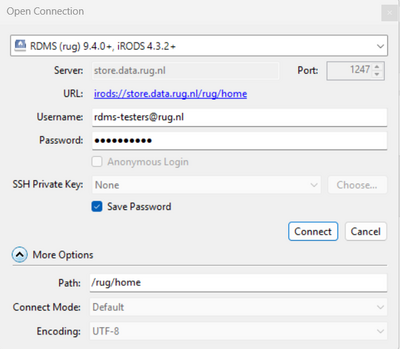
Note: As of July 2026, there is a new iRODS native template for the Cyberduck profile. If you are using the old profile, Cyberduck will fail to connect and will ask for your credentials again. The profile in the Wiki is updated.
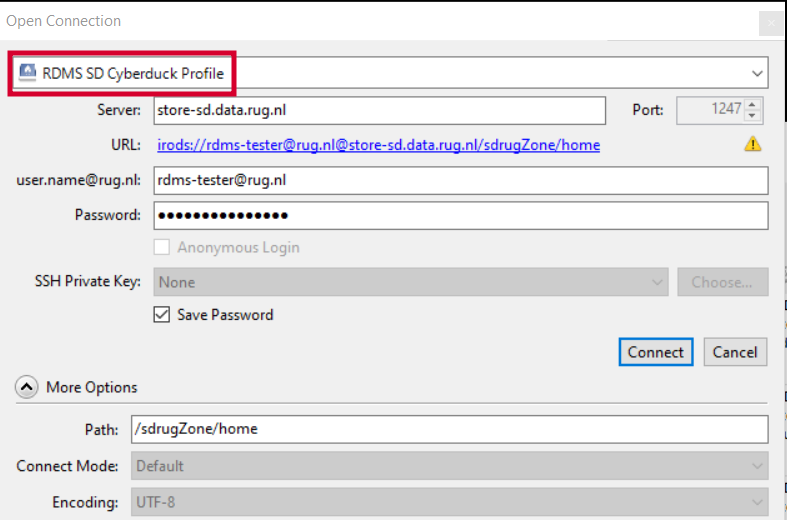
In order to access the RDMS SD zone, you need to first download the RDMS Sensitive data zone Cyberduck profile directly by clicking on the link below or by copying the content to a text editor of your choice and then saving it as a *.cyberduckprofile file. Afterwards, double-click the downloaded/created *.cyberduckprofile file to install and add it to Cyberduck. Then, click Open Connection, select the RDMS SD Cyberduck Profile protocol, and configure the login credentials as follows:
Cyberduck profile for the Sensitive Data Zone
- RDMSsd.cyberduckprofile
<?xml version="1.0" encoding="UTF-8"?>
<!--
  ~ Copyright (c) 2002-2017 iterate GmbH. All rights reserved.
  ~ https://cyberduck.io/
  ~
  ~ This program is free software; you can redistribute it and/or modify
  ~ it under the terms of the GNU General Public License as published by
  ~ the Free Software Foundation; either version 2 of the License, or
  ~ (at your option) any later version.
  ~
  ~ This program is distributed in the hope that it will be useful,
  ~ but WITHOUT ANY WARRANTY; without even the implied warranty of
  ~ MERCHANTABILITY or FITNESS FOR A PARTICULAR PURPOSE.  See the
  ~ GNU General Public License for more details.
  -->

<!DOCTYPE plist PUBLIC "-//Apple//DTD PLIST 1.0//EN" "http://www.apple.com/DTDs/PropertyList-1.0.dtd">
<plist version="1.0">
    <dict>
        <!-- DO NOT CHANGE. This is the purpose of the profile-->
        <key>Protocol</key>
        <string>irods</string>

        <!-- Undocumented for CLI, the URI prefix, e.g., rug:// -->
        <key>Vendor</key>
        <string>sdrug</string>

        <!-- Name of the profile -->
        <key>Description</key>
        <string>RDMS (sdrugZone) 9.4.0+, iRODS 4.3.2+</string>

        <!-- Default name of bookmark -->
        <key>Default Nickname</key>
        <string>RDMS sdrugZone zone</string>

        <!-- iRODS hostname settings -->
        <key>Hostname Configurable</key>
        <false/>
        <key>Default Hostname</key>
        <string>store-sd.data.rug.nl</string>

        <!-- iRODS port settings -->
        <key>Port Configurable</key>
        <false/>
        <key>Default Port</key>
        <string>1247</string>

        <!-- Default path to open -->
        <key>Default Path</key>
        <string>/sdrugZone/home</string>

        <!-- The zone of the iRODS server to connect to.  For backward -->
        <!-- compatibility, a root resource can be specified by appending -->
        <!-- ":<resource>" to the zone.  The specified resource is only -->
        <!-- used when uploading files.  Prefer setting "Destination -->
        <!-- Resource" under the "Properties" section. -->
        <key>Region</key>
        <string>sdrugZone</string>

        <!-- The authentication scheme used to establish a connection to -->
        <!-- an iRODS server.  Must be set to "native" or "pam_password". -->
        <!-- "standard" is an alias for "native". -->
        <key>Authorization</key>
        <string>pam_password</string>

        <!-- Advanced properties -->
        <key>Properties</key>
        <dict>
            <!-- The root resource to target when uploading files. -->
            <!-- DO NOT define this option unless needed. -->
            <!-- This option supersedes any resource defined by "Region". -->
            <key>Destination Resource</key>
            <string>rootResc</string>

            <!-- Controls whether deletion of an object permanently -->
            <!-- removes or moves it into the trash collection. -->
            <key>Delete Objects Permanently</key>
            <string>no</string>

            <!-- The size (in bytes) of a file that must be exceeded before -->
            <!-- using parallel transfer. -->
            <!-- The value must satisfy the range [1, 2^31-1]. -->
            <key>Parallel Transfer Threshold</key>
            <string>33554432</string>

            <!-- The number of iRODS connections used for parallel transfer -->
            <!-- of a single file.  Each transfer will use the specified -->
            <!-- number of iRODS connections. The value must satisfy the -->
            <!-- range [2, 10]. -->
            <key>Parallel Transfer Connections</key>
            <string>3</string>

            <!-- The buffer size (in bytes) used for parallel transfer of -->
            <!-- a single file. Applies to uploads and downloads.  The -->
            <!-- value must satisfy the range [1, 128MB]. -->
            <key>Parallel Transfer Buffer Size</key>
            <string>4194304</string>

            <!-- Secure communication options must be one of "CS_NEG_REQUIRE", -->
            <!-- "CS_NEG_DONT_CARE", or "CS_NEG_REFUSE". -->
            <!-- - CS_NEG_REQUIRE:   Demand TLS be used. -->
            <!-- - CS_NEG_DONT_CARE: Let the server decide if TLS is used. -->
            <!-- - CS_NEG_REFUSE:    Do not use TLS. -->
            <key>Client Server Negotiation</key>
            <string>CS_NEG_REQUIRE</string>

            <!-- TLS options, when enabled. -->
            <key>Encryption Algorithm</key>
            <string>AES-256-CBC</string>
            <key>Encryption Key Size</key>
            <string>32</string>
            <key>Encryption Salt Size</key>
            <string>8</string>
            <key>Encryption Hash Rounds</key>
            <string>16</string>
        </dict>
    </dict>
</plist>
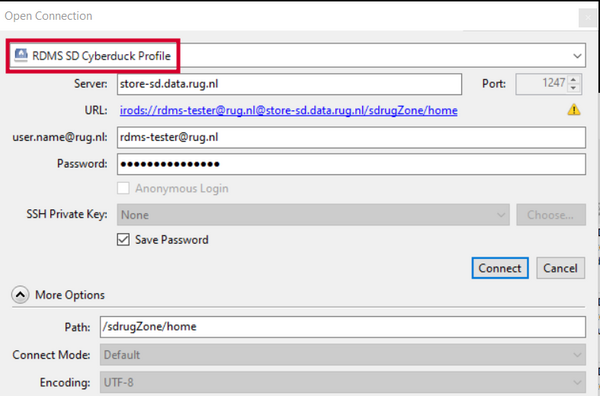
Note: If you experience issues with this, please make sure that you specified your username in lowercase. The login to the RDMS is case sensitive!
Transferring Data to and from the RDMS via Cyberduck
The instructions below give details on how to use the transfer dialogs to upload, download, and synchronize your data. Be aware that drag-and-drop from/to the file explorer is also supported with the same results.
The main functionality you will wish to use with Cyberduck is transferring your files from your local storage to the RDMS. Follow the instructions below to see how this is possible.
Click to display section
Once you are connected to the RDMS via Cyberduck, navigate through the Cyberduck interface to the desired target collection for uploading data. Your Home Drive is available at /rug/home/<username>@rug.nl, while Team Drives or your available Projects are located under /rug/home/<Team_Name> and /rug/home/Projects/<Project_Name>, respectively.
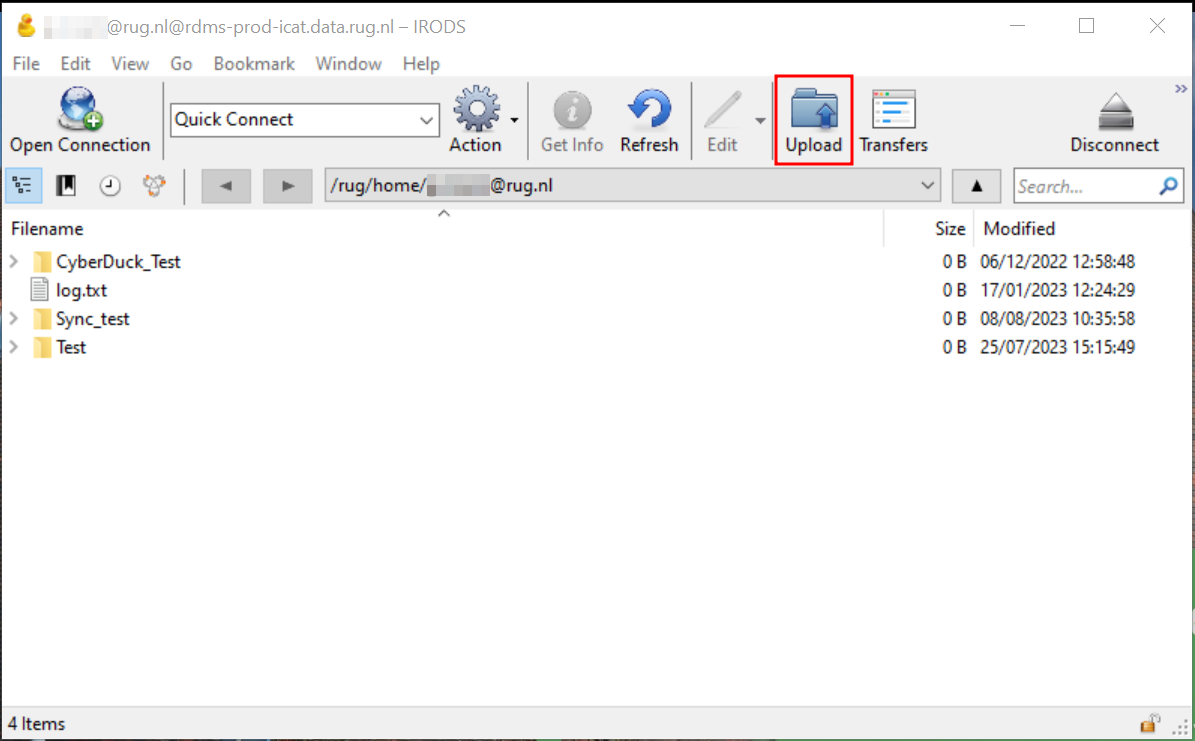
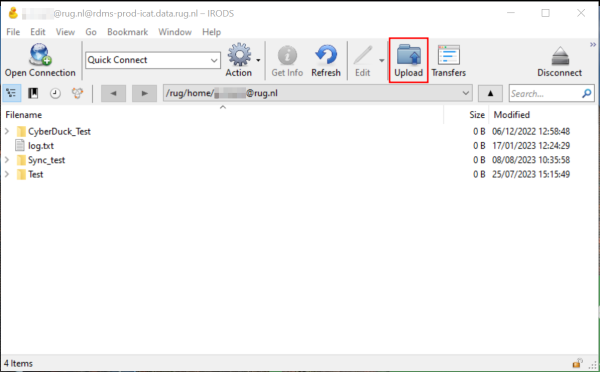
Once you are in the desired collection, click on the upload button in the top bar (red outlined).
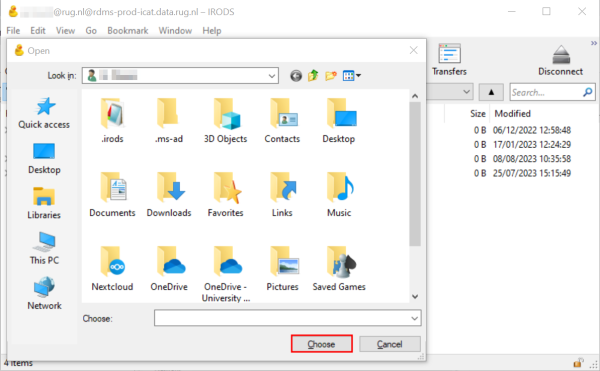
This will open a new window. Here you can navigate to the file(s) you want to upload and, once selected, you can start the upload by clicking the red outlined button.
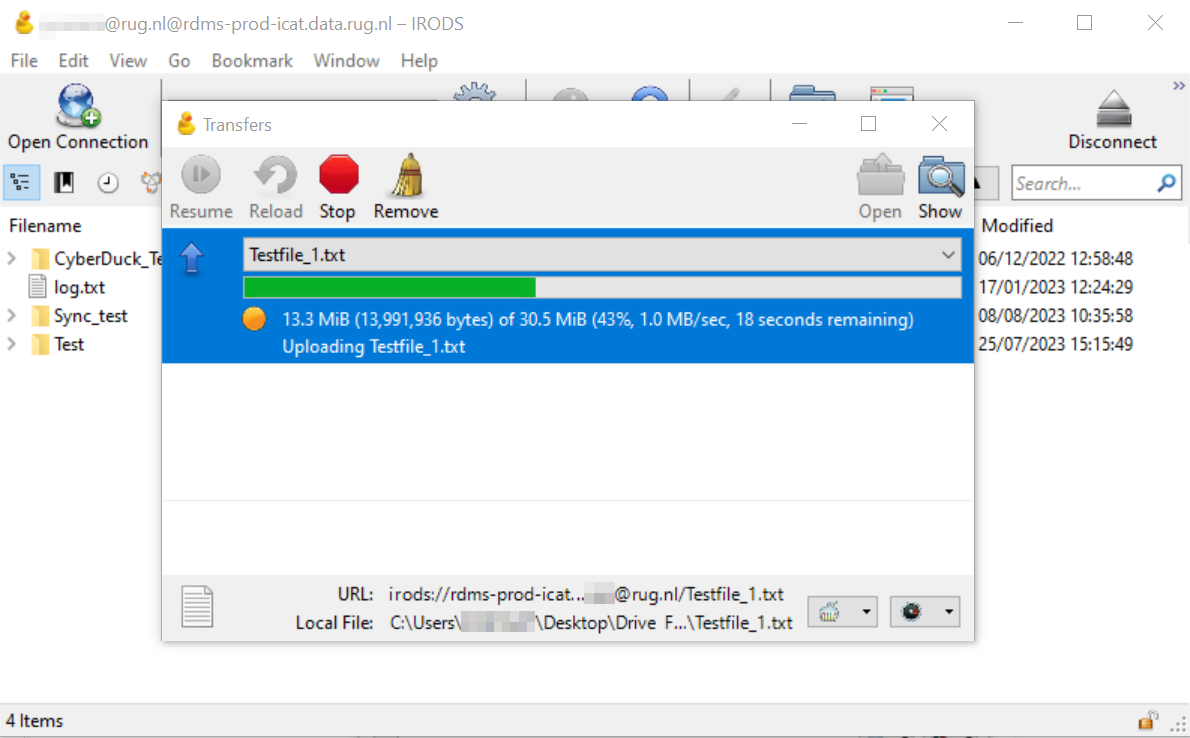
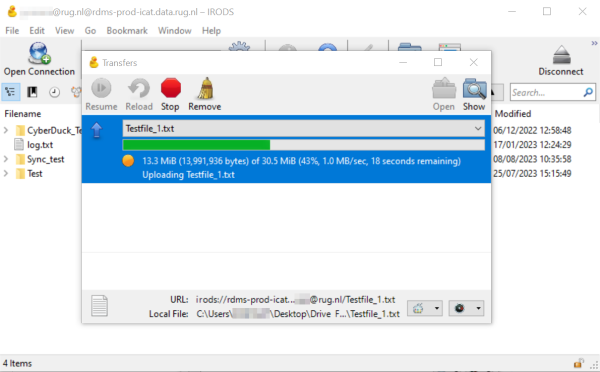
The upload will now start, and the window shown in the picture will appear.
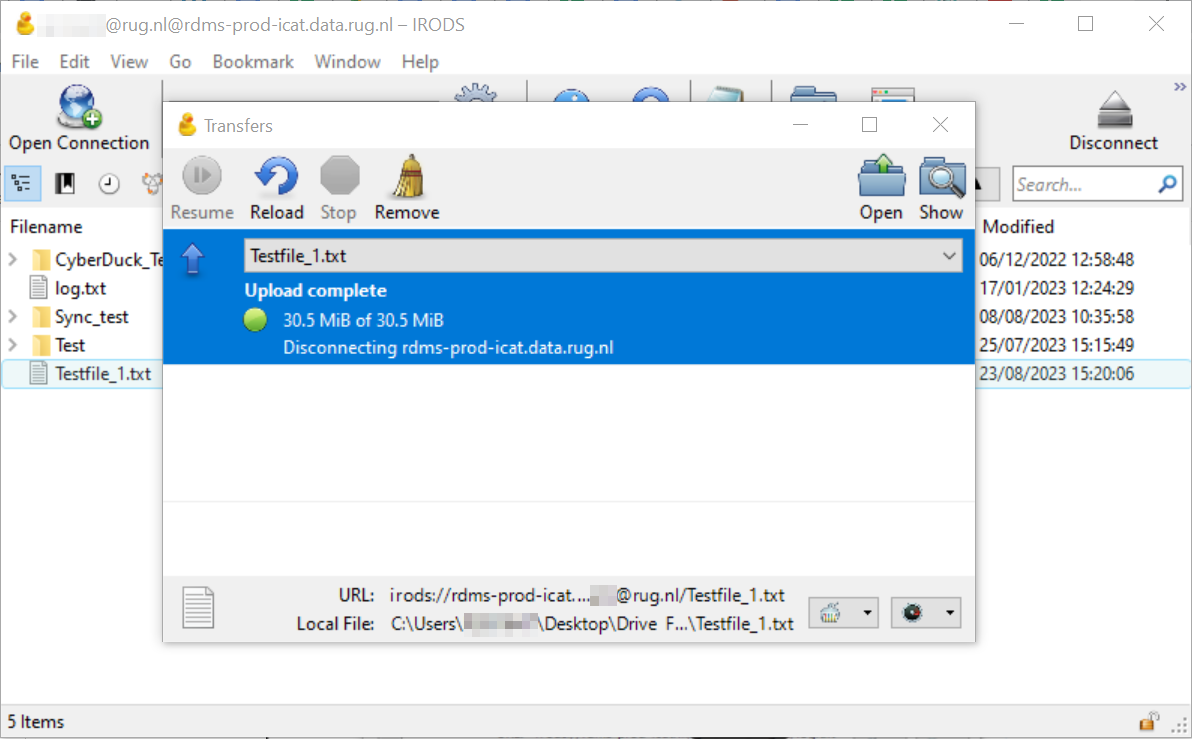
If the upload finished successfully, Cyberduck will show the message below.
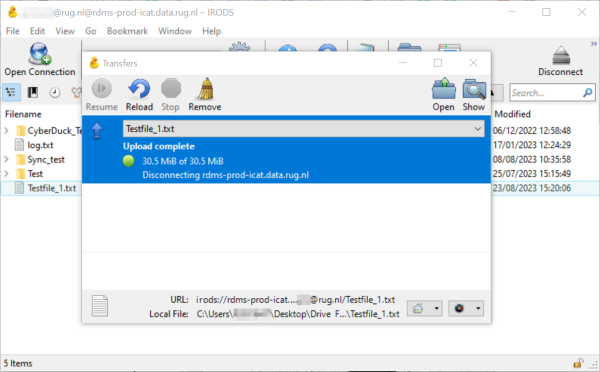
Finally, if you closed the window above, but would still want to check the history of your recent uploads, you can click on the Transfers button in the top bar (red outlined). The window will then reopen and show you the recent transfers.
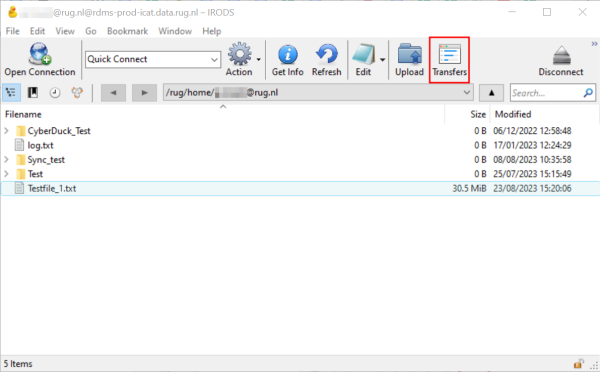
If instead you wish to retrieve data previously stored on the RDMS, you can follow the instructions below to initiate your transfer.
Click to display section
To download data from the RDMS using Cyberduck, you need to follow a slightly different procedure compared to the upload of data. For instance, there is no download button at the top of the GUI, but the download functionality becomes available by right-clicking the file or folder you wish to download. So, navigate to what you wish to download using the file explorer of Cyberduck and right-click it. This will display the following menu.
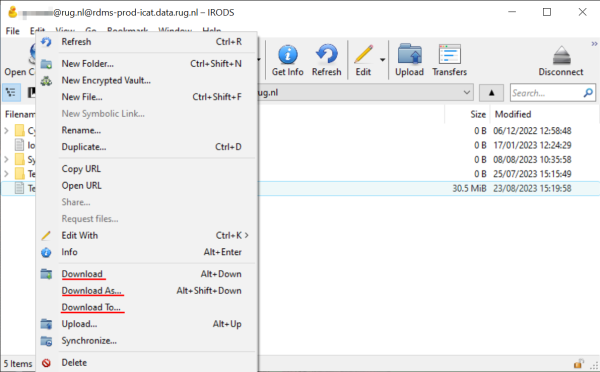
Here you can select either of the three red underlined options: Download, Download As…, or Download To... The first option, Download, will let you download the file in the specified download directory, which you can set yourself by following the relevant step described in the Transfer Preferences section below.
The second option, Download As…, will open up a window that will let you navigate through your local file structure and also rename the file you wish to download. Here you can potentially also change its file extension, though we recommend you do not do so.
Finally, Download To… will open a window that will let you choose where to save the file, but will not let you rename it.
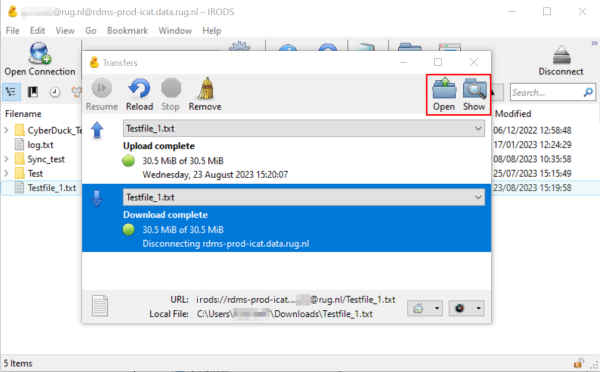
Whichever option you choose, starting the download will open up the transfer window, where you can follow the progress of your download. If it succeeded, you will see the green icon displayed below and the confirmation that the download is complete. Should you have any trouble finding the file you downloaded in your local file structure, you can find it or open it by clicking on the download so it gets blue highlighted and then clicking one of the two icons in the red box.
Apart from uploading or downloading files or entire folders manually in Cyberduck, you can also give the client the command to synchronize one of your local folders to a collection on the RDMS. The advantage of using synchronization rather than uploading or downloading the data is that the synchronization will not transfer every file, but only act on files that have been changed or that don't exist in the target directory. This will reduce the amount of data you will transfer at any one time.
Click to display section
To synchronize your folder, simply right-click the collection you wish to sync, and the following menu will be displayed.
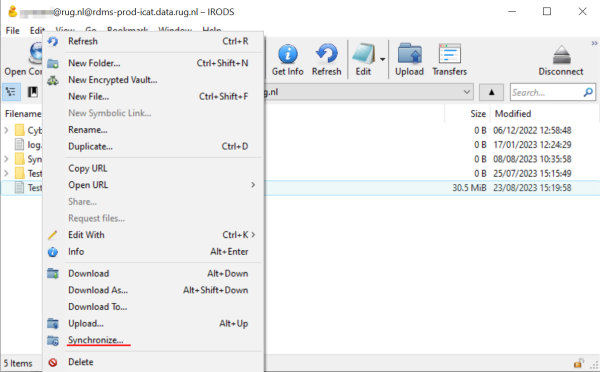
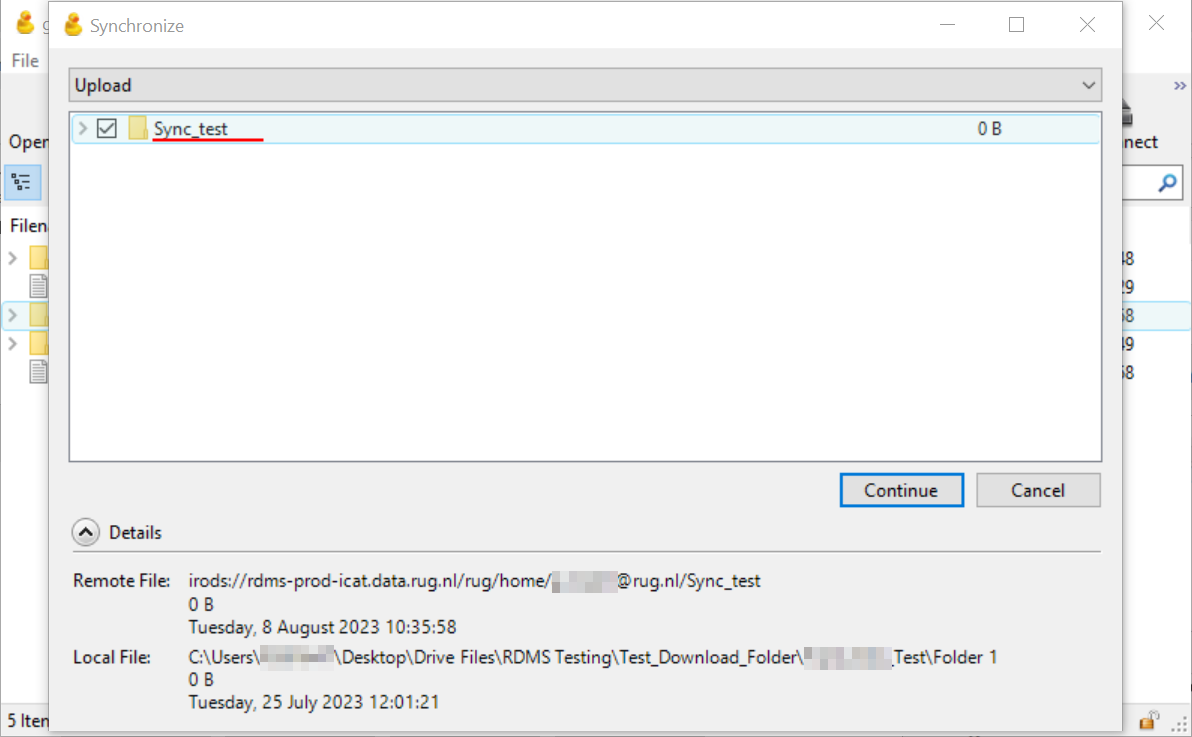
Click on Synchronize… (red underlined), and the next window will open. There, you can navigate to the folder on your local machine that you wish to sync to the RDMS collection. Once you have selected it and confirmed, the transfer window will open, and after a few seconds, this window will appear.
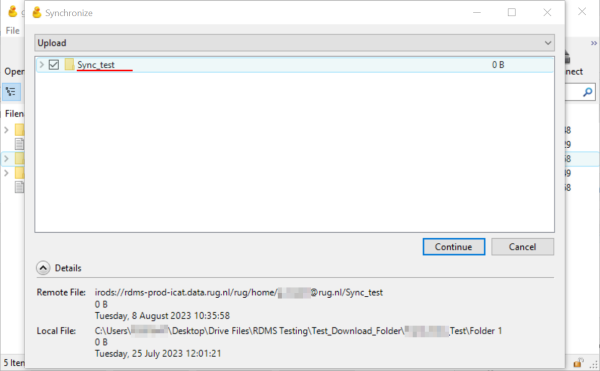
Among other things, the window will show the collection you wish to sync once again. Please make sure that it is indeed the collection you want to sync by checking the red-underlined entry. You can also check under Details that the remote and the local files correspond to the collection and folder you selected. N.B.: Cyberduck talks of "files" here, but this obviously also applies to folders.
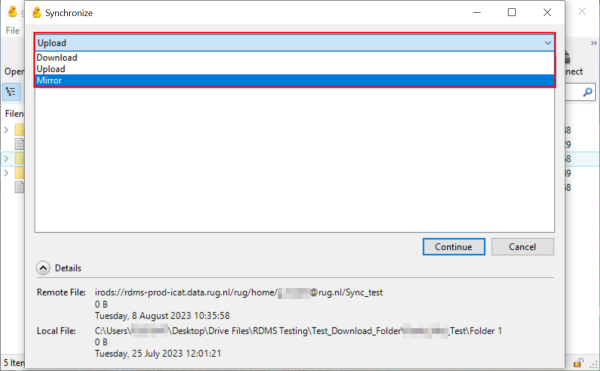
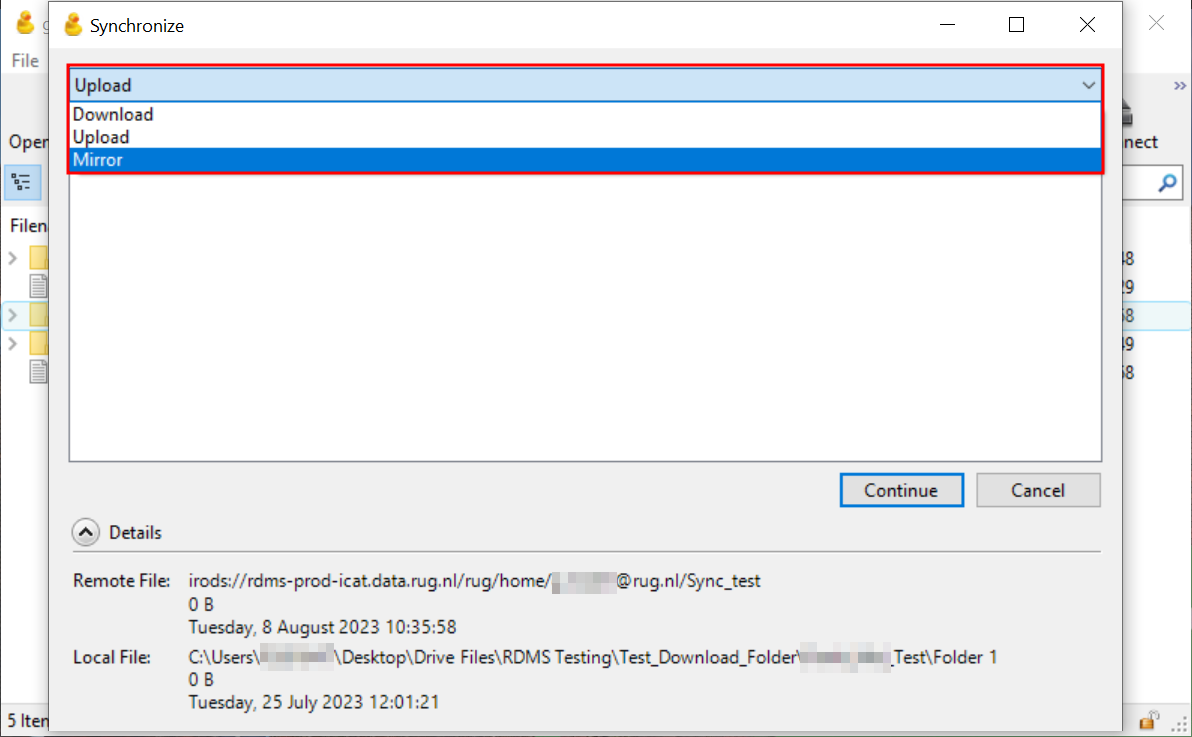
Finally, if you click the red box shown above, you will be given three options for how Cyberduck is going to handle your sync. Your options are:
We suggest that you either use "Upload" or "Download" when using the Sync option, as you have a better handle on what is going to be changed. Please also keep in mind that Cyberduck's synchronization feature is a one-time action. If you wish to sync your folder again, it will not happen automatically, but you will need to repeat the steps above.
Cyberduck lets you edit the way your transfers happen by choosing certain preferences. Below we list the main preferences you might want to adjust before starting your first transfer.
Click to display section
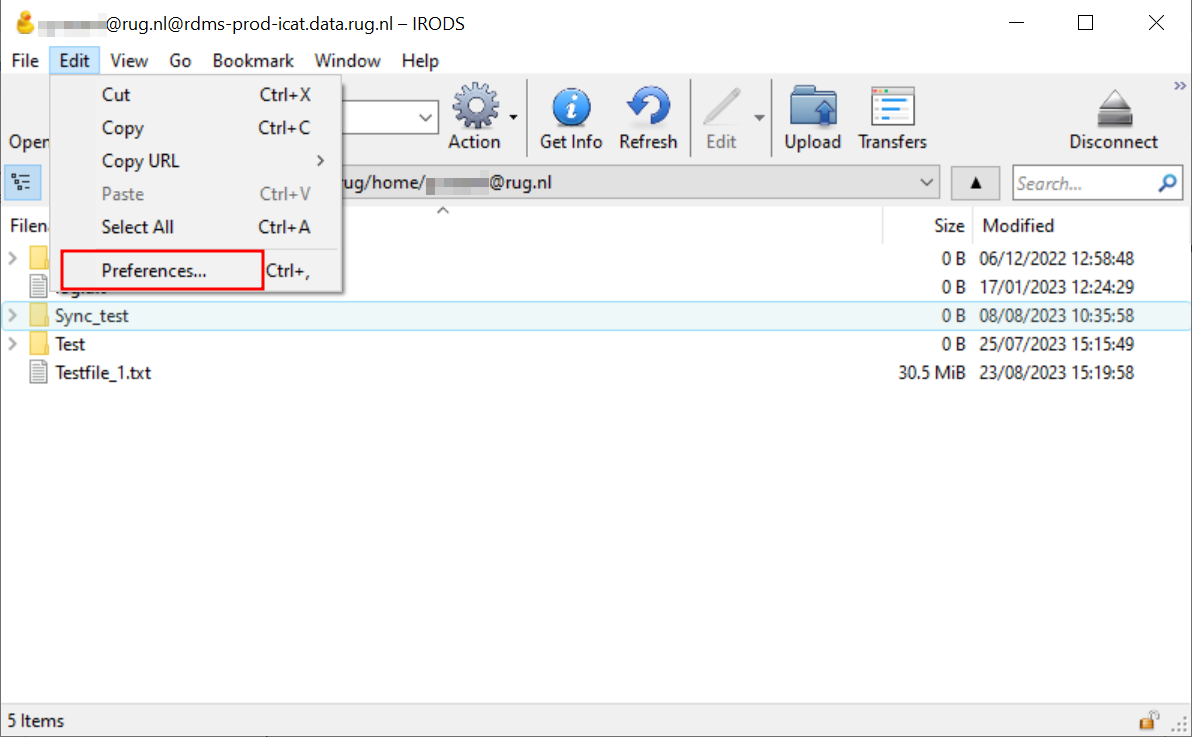
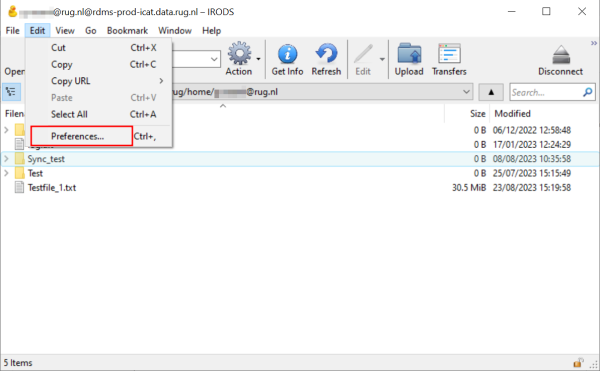
In order to ensure that your transfer completes correctly, we suggest that you navigate to the Edit –> Preferences… tab in the top menu and adjust your preferences. The picture below shows what you need to click to make the preference menu appear.
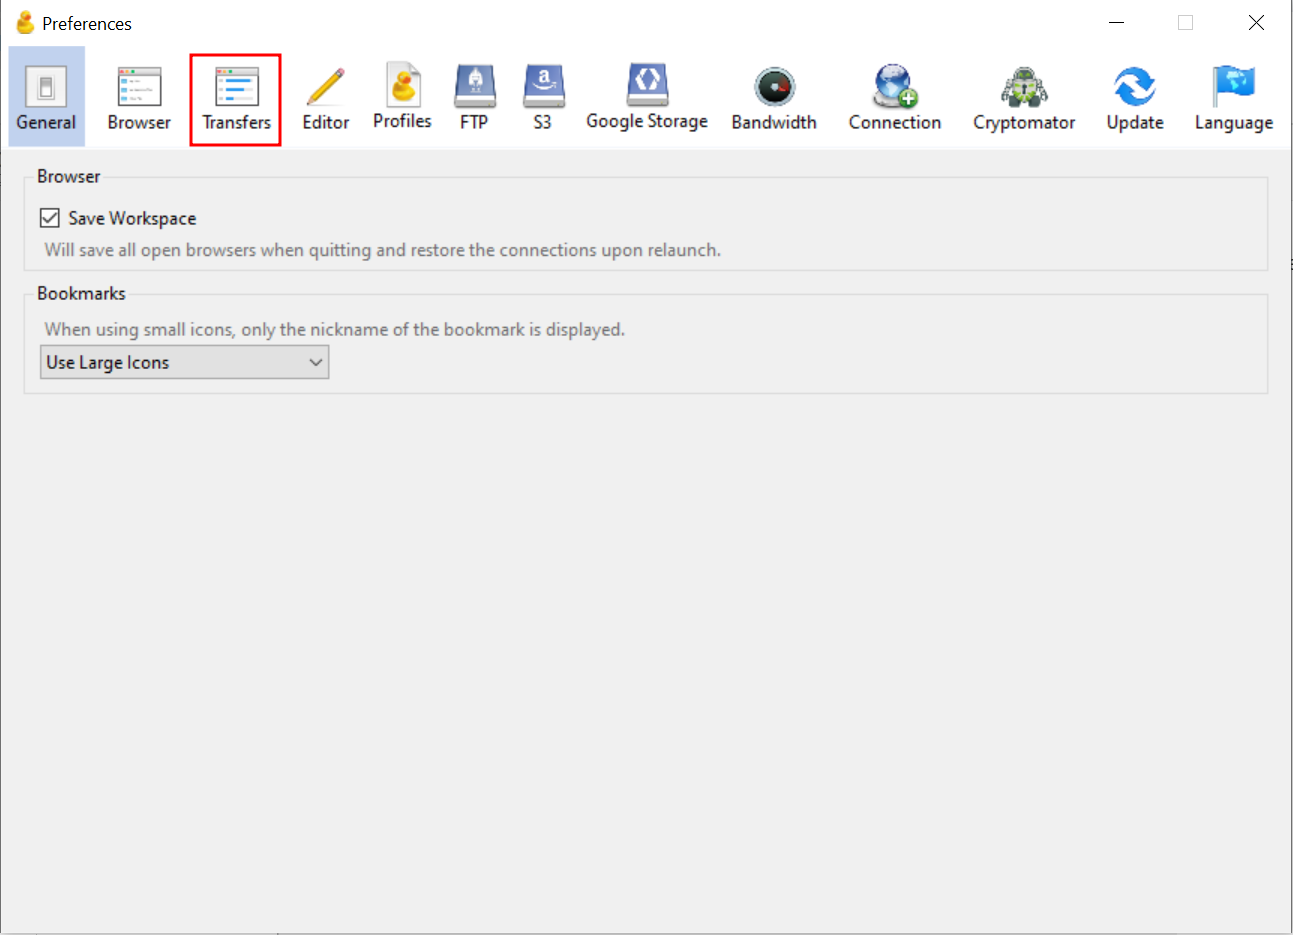
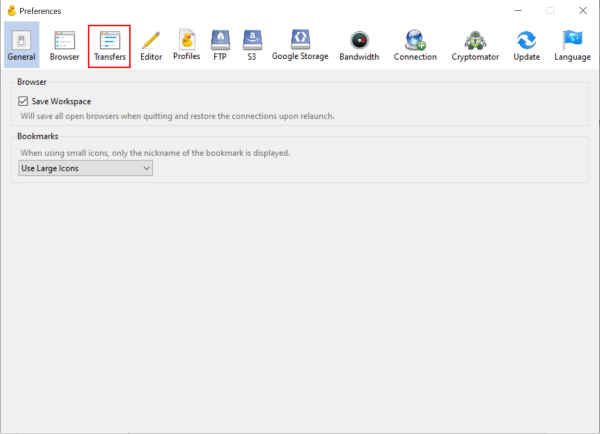
Once the menu is open, navigate to the transfer tab (red box) and click it. There are other preferences available at this stage, but we recommend that you only change how your transfers are handled.
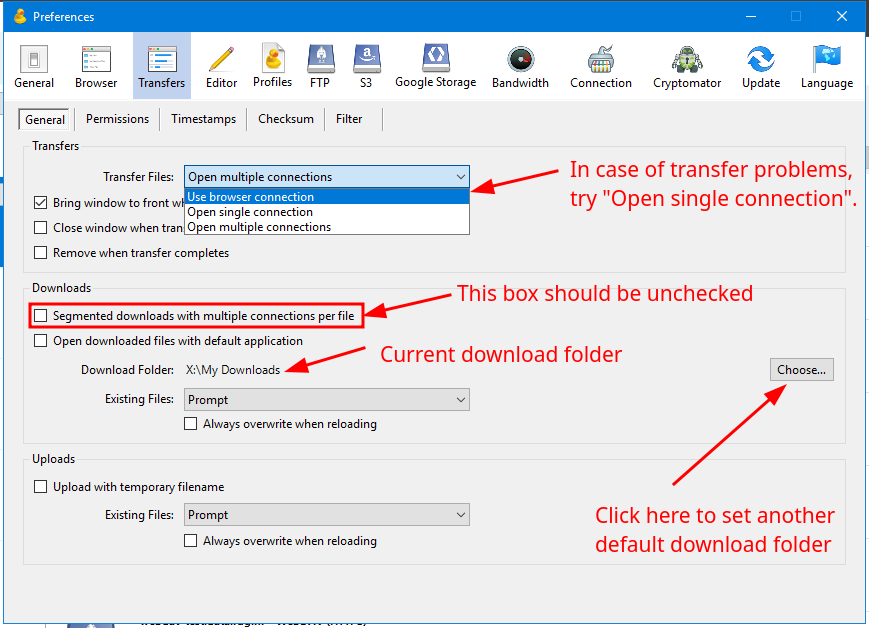
This is not a necessary change, but if you are running into connection timeout issues with Cyberduck, navigate to the "General" tab in the "Transfers" window. Changing the option under "Transfer Files" from "Open Multiple Connections" to "Open Single Connection" can help solve that problem.
Furthermore, be sure that you disable the option for segmented downloads as this can introduce issues with your downloads.
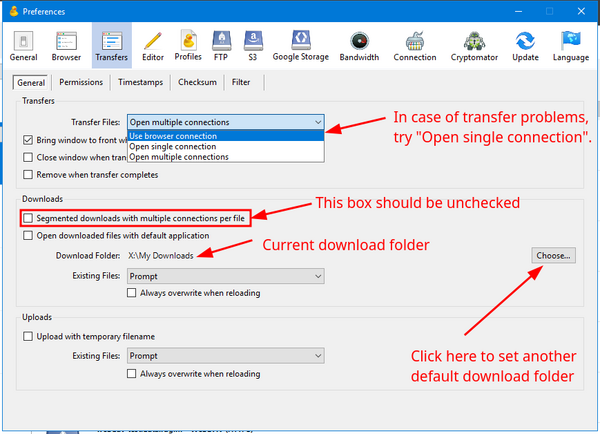
In the same section of Cyberduck's preferences, you can also adjust your default download folder. If you wish to change the current setting, just click on the Choose… button to the right and then navigate to the folder you wish to set as preferred download destination.
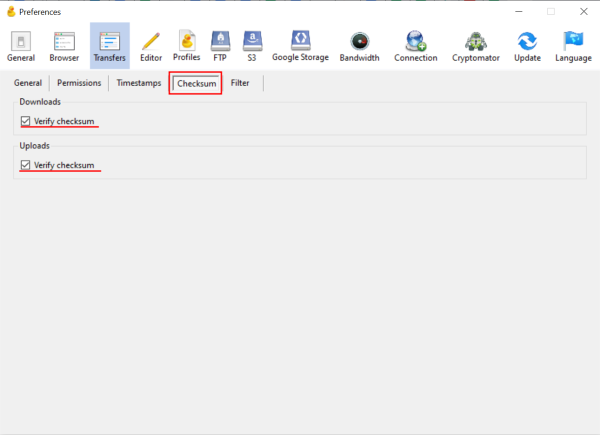
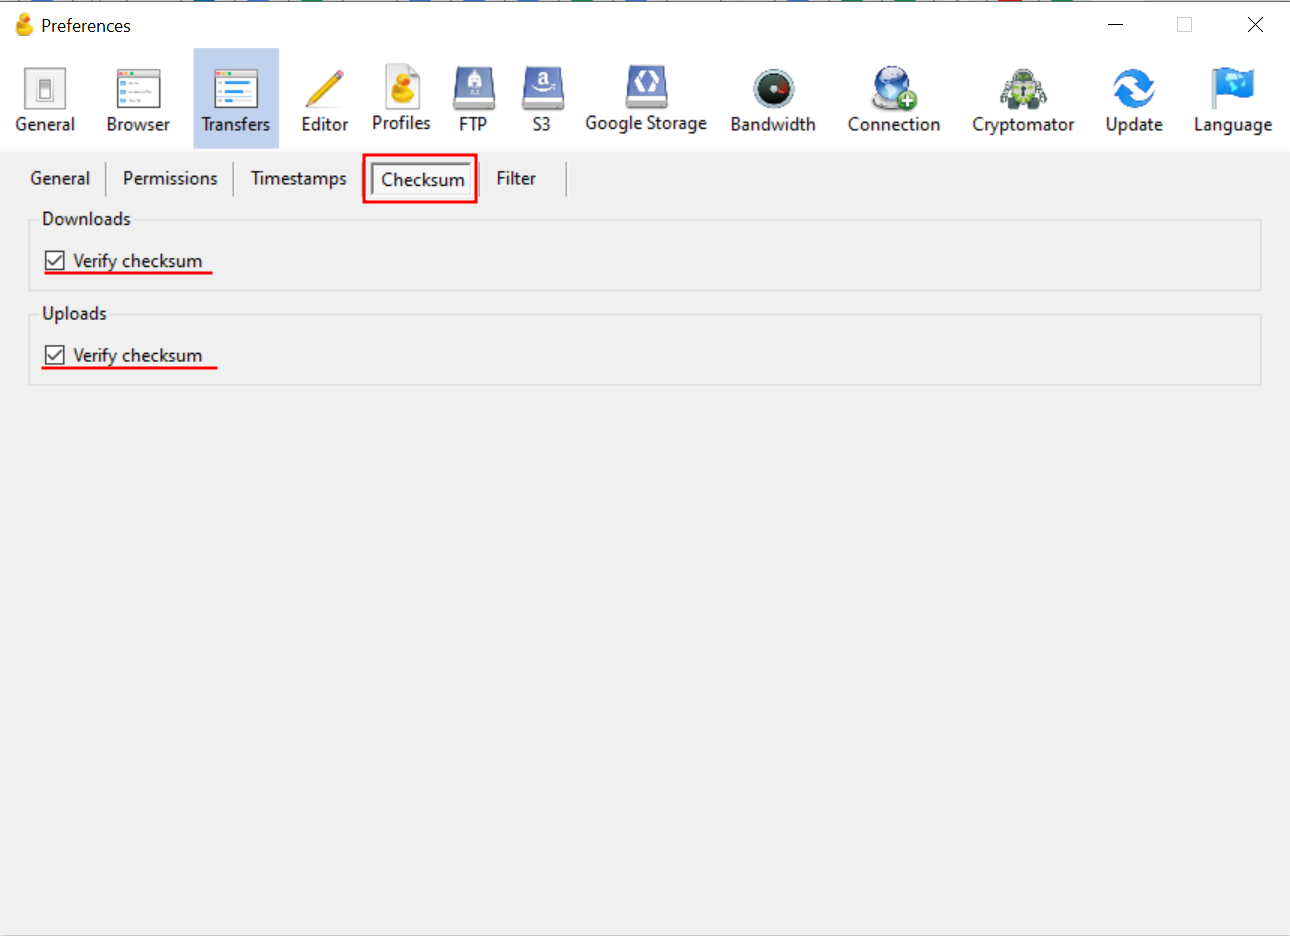
Finally, the one option we recommend you turn on in your preferences is to always verify the checksum of your files, both in upload and in download, otherwise only the size is used. To do this, simply check the two boxes as shown in the picture.