This is an old revision of the document!
Search
The RDMS web interface comes with an extensive and flexible search functionality. Unlike other UG storage solutions, this search engine offers the advantage of utilizing metadata for exact data queries. Additionally, the integrated search engine also allows you to make more elaborate queries or searches, such as combining multiple metadata entries.
The next subsections will explain the basic functions of the integrated search and provide some more elaborate search and query examples using metadata.
Accessing RDMS Search
You can access the search engine via the left-side Menu bar in the web interface.
After logging into the interface, click the ![]() button to open the search function in the current window (see screenshot below).
button to open the search function in the current window (see screenshot below).
General Functionality
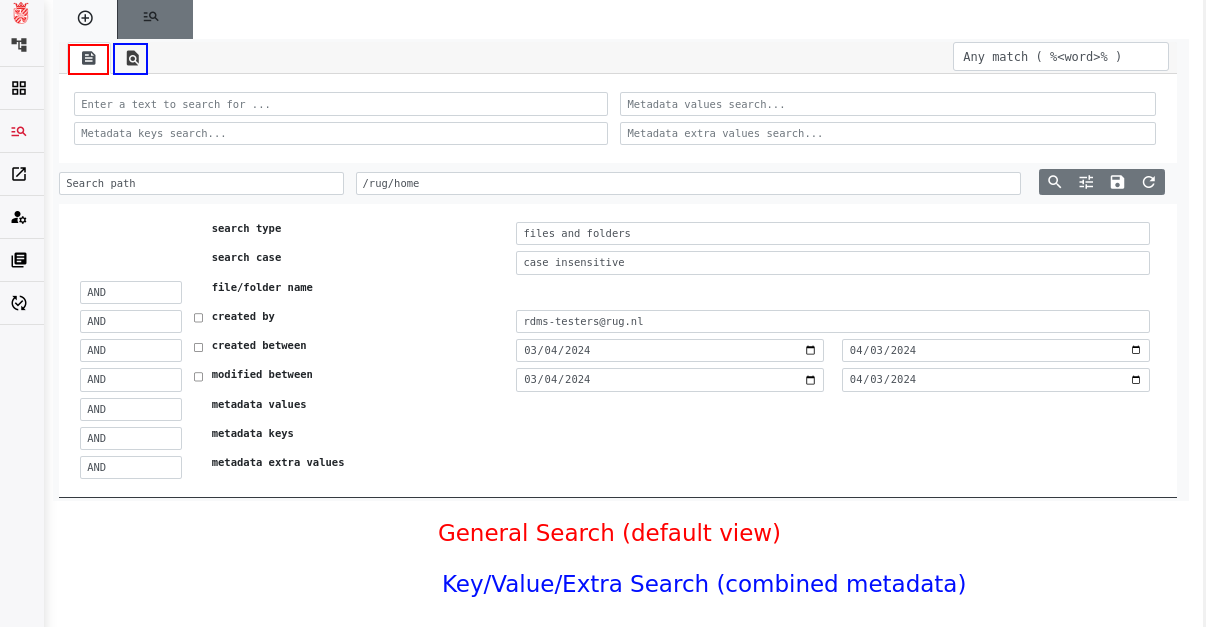
General vs. Key-Value-Extra Search
The search functionality in the RDMS is available in two distinct options:
- General search: This option allows you to find a file or folder based on various criteria. It uses both file metadata and metadata added by the user to search the system for files and folders fitting the desired parameters. This option does allow you to search for files using metadata entries you created, but if you wish to combine multiple metadata entries into one search, then you need to use the next search option.
- Key-Value-Extra (KVE) search: This search option is specifically designed for querying using multiple metadata entries simultaneously. You can access this search option via the
 button at the top of the search interface.
You can switch between these search options by selecting the respective tab from the top of the search interface. Further below in this page you will find more examples demonstrating how to utilize these search options for both simple and more complex queries in the RDMS.
Tabbed Searches
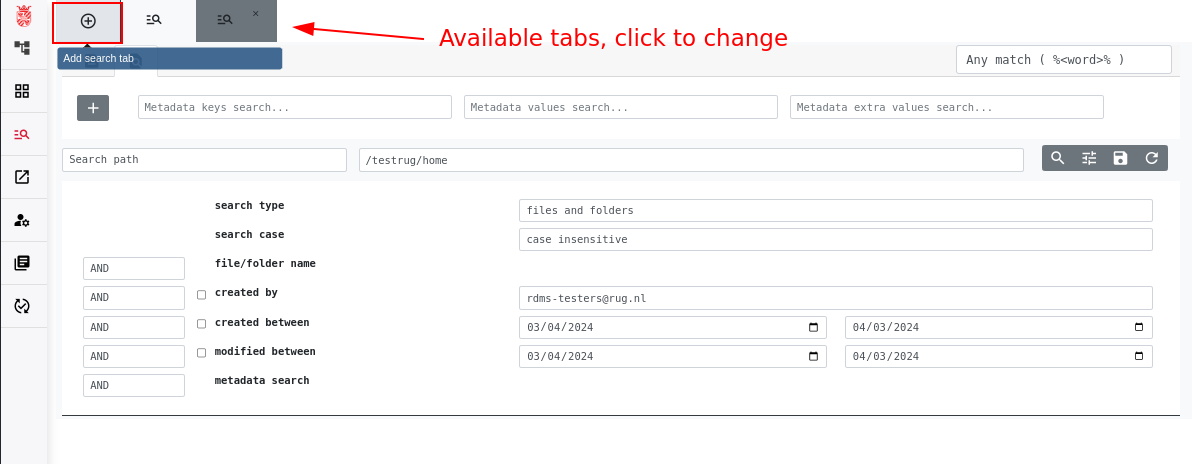
If you wish to perform and manage multiple search queries simultaneously, the top menu in the search interface allows you to add new search tabs via the ![]() button.
button.
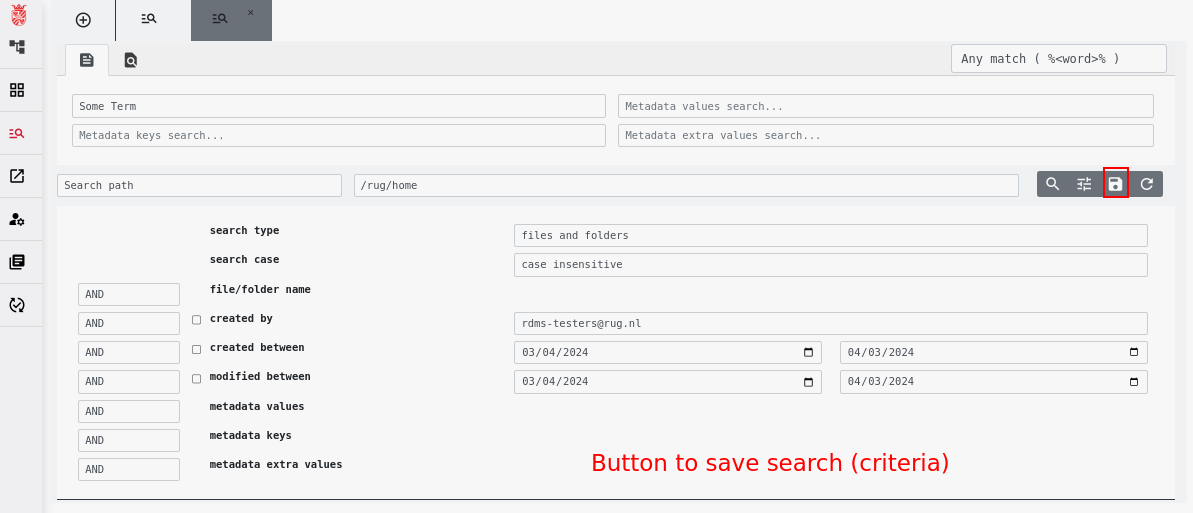
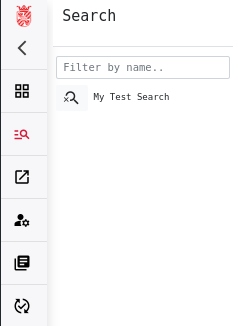
Saved Searches
Another function available to you is to save searches for future use. To save a search, click the ![]() button in the search view after you specified your desired search terms.
button in the search view after you specified your desired search terms.
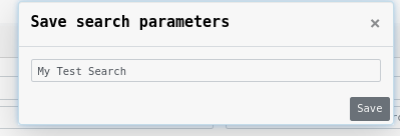
The system will then ask you to name the search you are saving. We suggest you choose a meaningful and descriptive name for the search, so as to be able to recall what the search was meant to do when reloading it later on.
If you want to reload a saved search, simply look to the browser menu in the search window. All your saved searches are visible there, as shown in the screenshot below. Clicking on the name of a saved search will load the parameters into the search window of the RDMS. Click on the ![]() icon in the search window to initiate the search. If you want to remove a saved search, click instead on the
icon in the search window to initiate the search. If you want to remove a saved search, click instead on the ![]() icon.
icon.
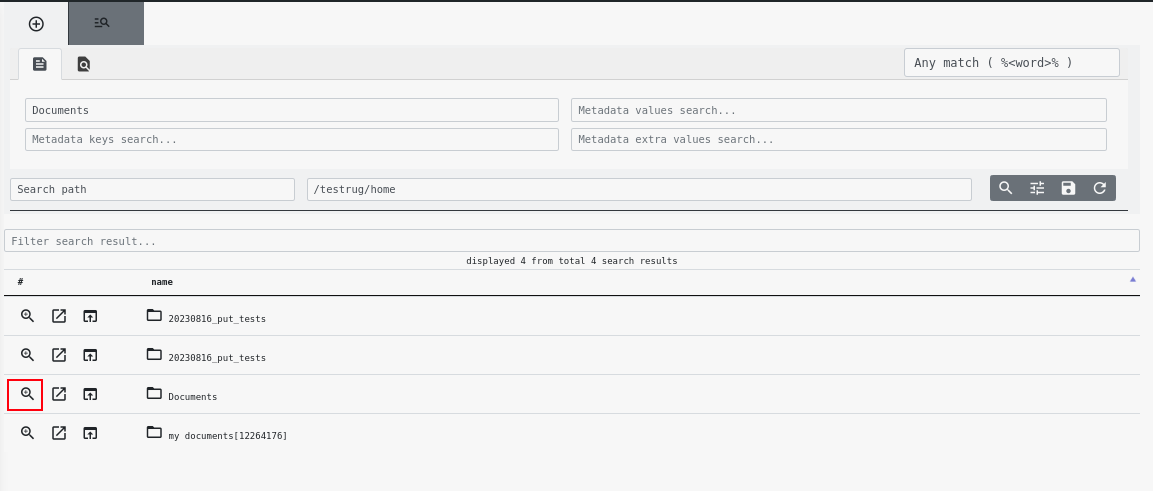
Sub-Searches
Whenever a search finds at least one object, the RDMS allows you to execute subsequent searches based on the search result that was found. To access this feature, click on the icon highlighted in red in the screenshot below. The RDMS will then open a new search tab with the search parameters of the previous query already defined. Click on the ![]() icon to initiate the search inside the new location.
icon to initiate the search inside the new location.
Notes:
- If you want to perform a sub-search on a folder, then the RDMS will repeat the search inside the folder you selected.
- If instead you select a file for the sub-search, then the RDMS will perform the search inside the folder containing said file.
- Inside the sub-search tab, you can use either the general search or the KVE search.
- If needed, you can also do sub-searches of sub-searches. The process is simply repeated for the new location.
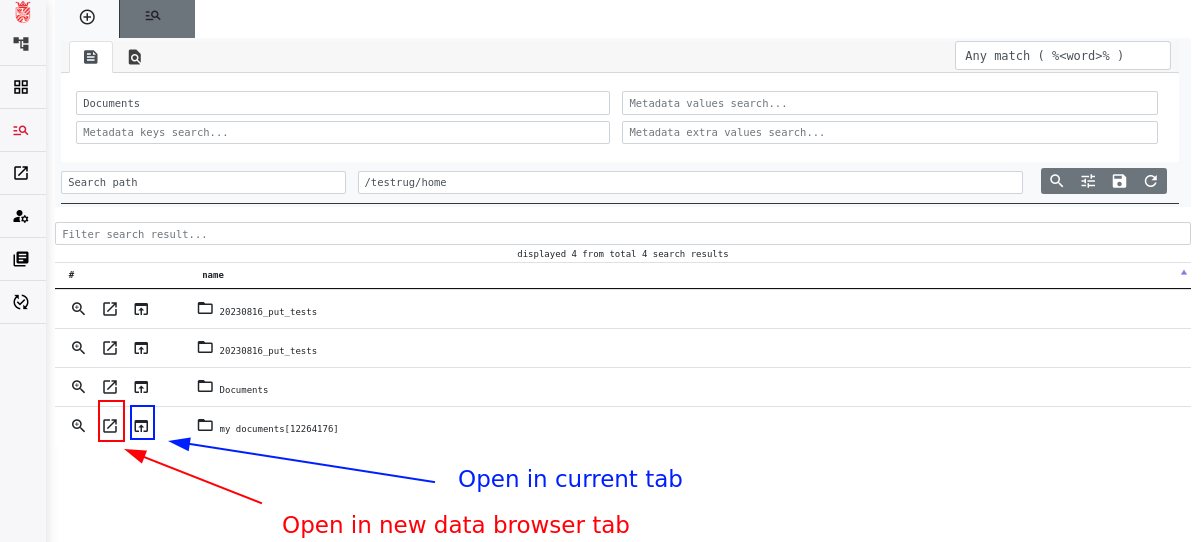
Opening Search Results
Once you have performed a query, the RDMS search window allows you to open the location of specific search results in two different ways:
 button: This button opens the result in a new data browser tab. This will keep the initial search active in the parent tab, should you want to go back to it.
 button: This button opens the result in the Data Browser. This replaces the search window with the Data Browser open in the location of the file you found. If you want to return to the search, you will have to navigate back to the search window from the left-side Menu and perform the search again.
Using RDMS Search
General Search
To perform the most basic form of searching for data, you can specify the search term in the top-right box in the search engine and then execute the search by clicking on the ![]() icon (see screenshot).
icon (see screenshot).
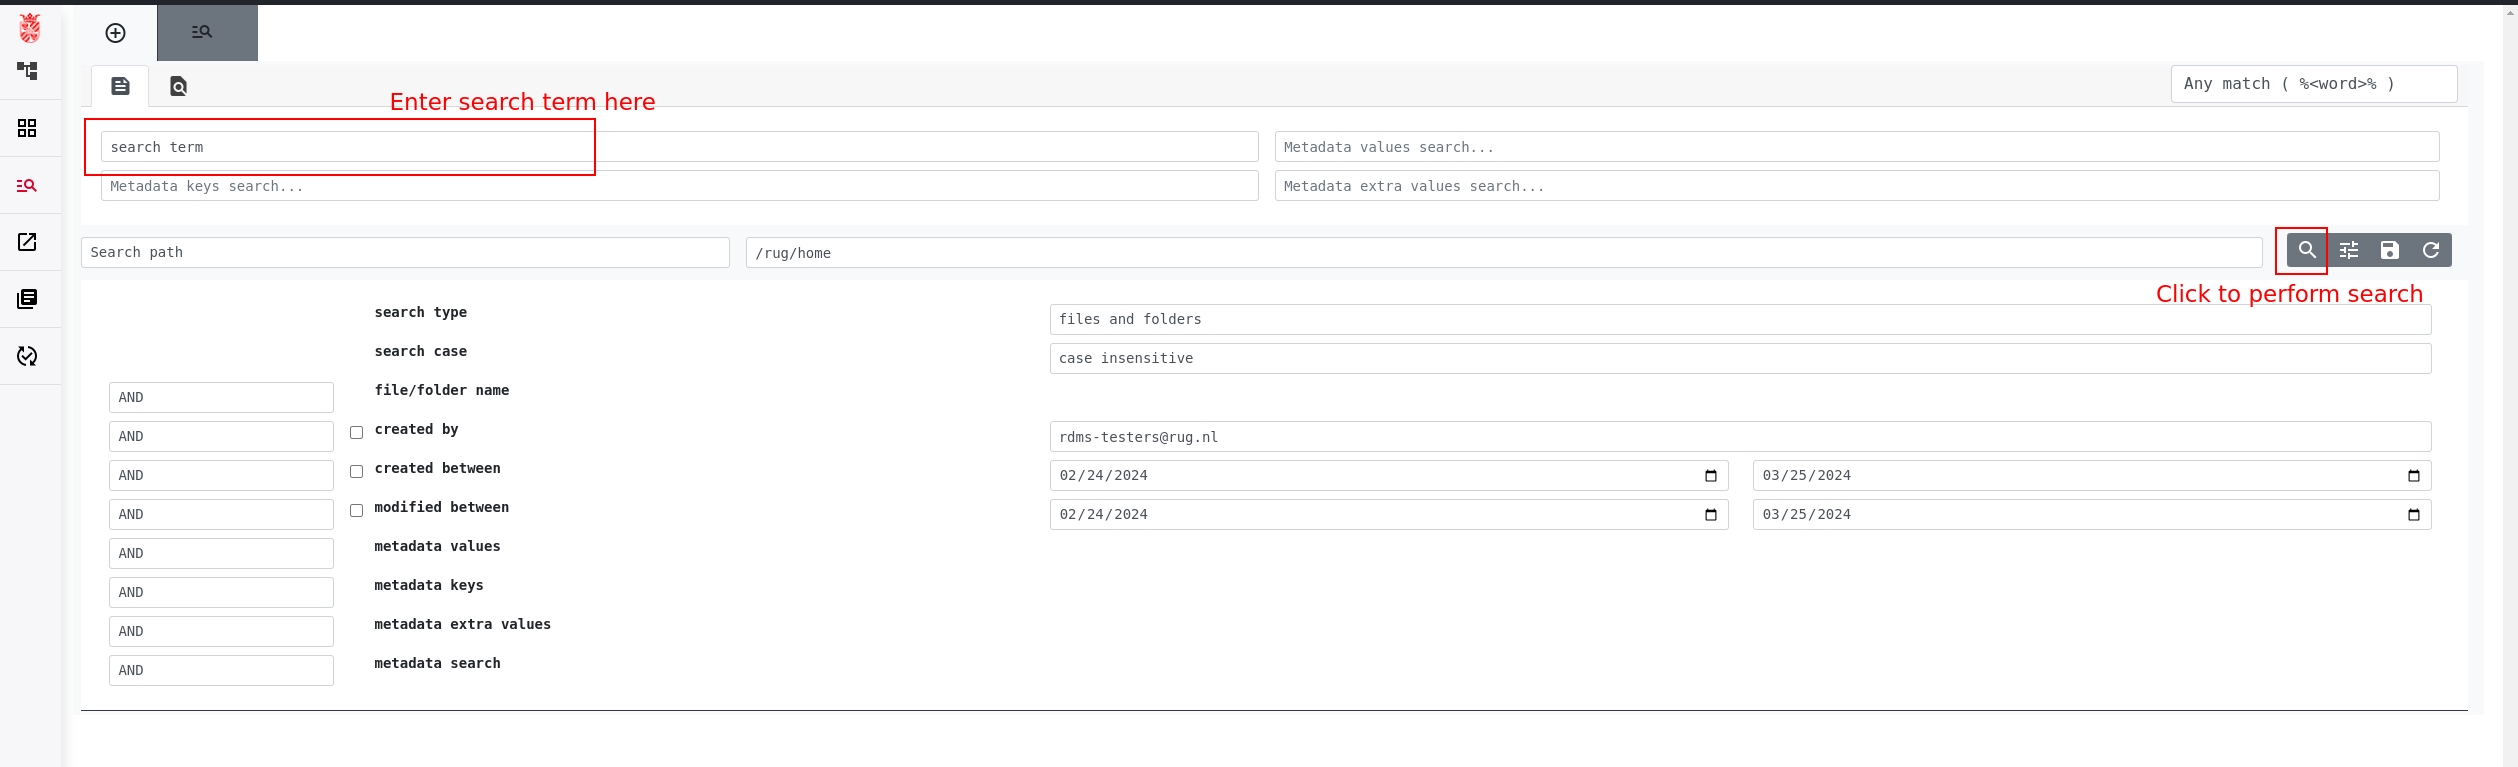
This method of searching makes the RDMS look for the specified term in any part of the metadata attached to your files and folders. In other words, it does not matter if the term is contained in the file name, the file path, or any of the metadata entries attached to the file. As long as the term is contained somewhere, the file will be shown as a result in the search.
If you want to target a specific metadata entry in your search, you can adjust the search criteria by directly searching for a specific metadata value, key, or extra value. You can modify the path where the search needs to be performed, and you can also indicate whether you want to search for files and folders, or only for one of the two. Other options as to what you can adjust in the search are visible in the screenshot above and explained in the text below.
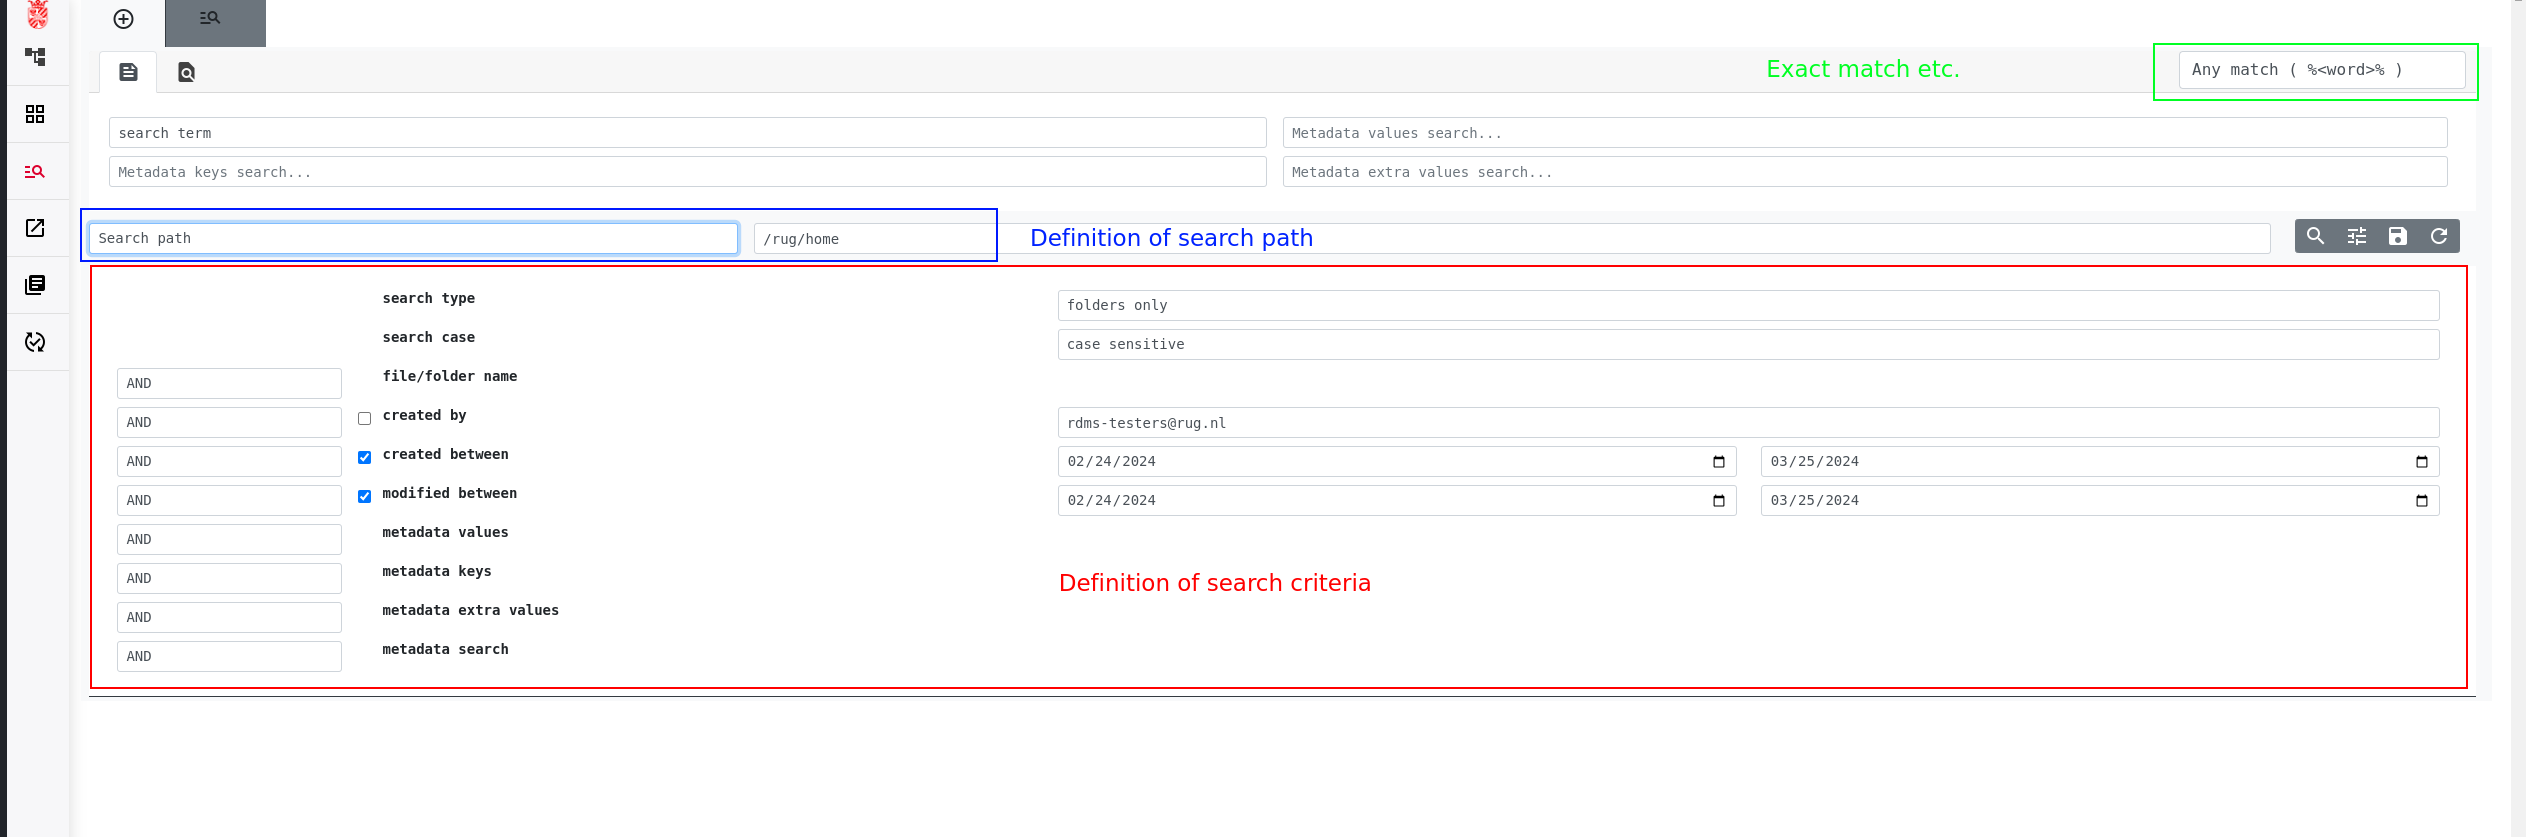
In the screenshot above, you can see the three different areas where you can specify the search criteria in the main search view:
- Blue Box: Here you can specify the path of the location you want to search in. The default value here is
/rug/home/, but you can adjust it either manually, or by performing a sub-search as described above. There are also several pre-defined values possible (e.g. "My home" or "All"). - Red Box: Here you can specify more details about the search mode. For example, you can say if you want to see files or folders, if you want to find just data created in a certain time frame, or if your search should be case sensitive or not. If you do not see this menu, you can reveal it by clicking the
 button. By default, all parameters are considered to have to be valid at the same time for an object to be considered a valid search result (logical argument is
 AND, look to the left inside the box). If you want to find objects that do not need to fulfill all the search criteria simultaneously, please change the relevant values toOR. - Green Box: This additional box allows to further fine-tune the search method. In this field, you select how the entered search term(s) should be interpreted.
Any match (%<word>%)will find the search term either alone or contained in another term (e.g. searching for "time" would also be positive for "timecapsule" or "walltime").Exact matchon the other hand just gives a positive search result if the exact search term(s) where found. The two other selection criteria,Right truncated (<word>%)andLeft truncated (%<word>), are positive if the search term was found either at the start or end of a value, respectively.
Note: The % sign in the green box explanation is the wildcard sign for the RDMS search. Its meaning is that whatever is not contained by two % signs or does precede or follow it, does not matter. Example: "%cube" would find all entries that are either the exact word "cube", or that end in the word "cube", no matter with what other term they start. Please keep in mind that the position of the % sign matters when performing a search.
Search Using Metadata
While the general search window can also be used to search based on metadata, the separate Key-Value-Extra (KVE) search was specifically designed to facilitate queries that use multiple, combined metadata values as the search criteria.
To perform a KVE search, first access the KVE tab (![]() ) from the top of the search view. You will see that the KVE search contains search fields for metadata keys (K), metadata values (V), and metadata extra values (E) while the
) from the top of the search view. You will see that the KVE search contains search fields for metadata keys (K), metadata values (V), and metadata extra values (E) while the Enter a text to search for function that was available in the general search is not available here.
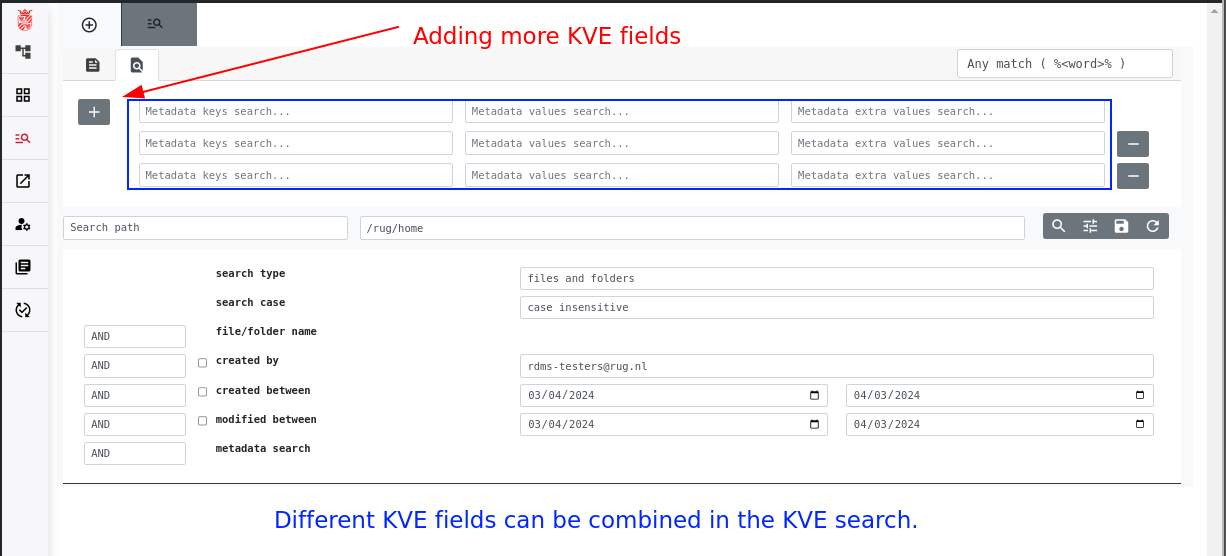
Instead of being able to search for only one term for each field, the KVE search allows to add new KVE lines by selecting the ![]() button. If you want to remove a KVE line that you added, you can use the
button. If you want to remove a KVE line that you added, you can use the ![]() button to do so.
button to do so.
We will use the example below to explain the correct usage of this functionality. Let us start with the search shown in the screenshot below:
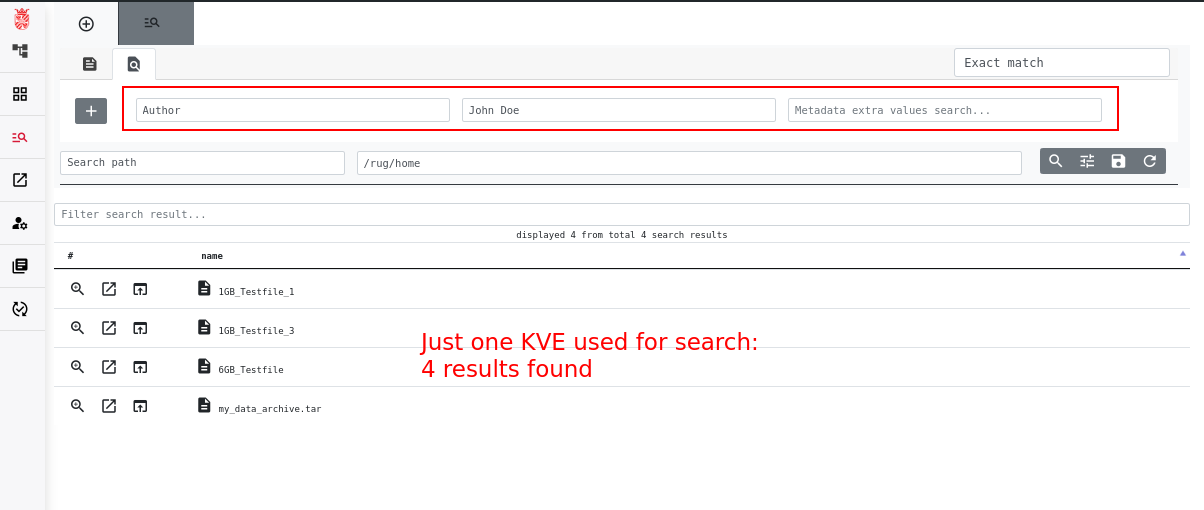
In this example, we used a single KVE line as search criteria (Key: "Author", Value: "John Doe") which resulted in four files being found by the search. While four files are easy to sort through to find the correct file we want, let's consider that instead the search returned a number of files in the thousands. Because those would be too many files to sort through, we attempt to filter the results by adding a new KVE line. So we press the ![]() and add a new KVE line with the search terms:
and add a new KVE line with the search terms: Key: "Date", Value: "today".
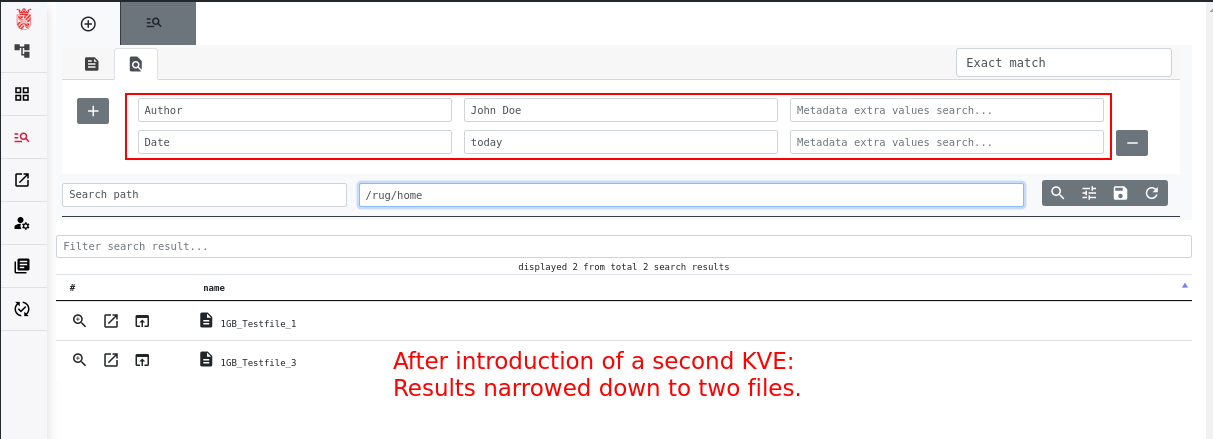
Instead of seeing the four results as before, we now just get two of the previous results shown. This is because only two files contained the combination of Author: John Doe and Date: today in their metadata. As a result, the other files are removed from being listed in the second search.
But let's assume that our attempt at filtering has failed and that we still have too many files to sort through. We decide to introduce a third KVE line with the terms Key: "Distance", Value: "10", Extra value: "m", which results in finally having only one result in the search list.
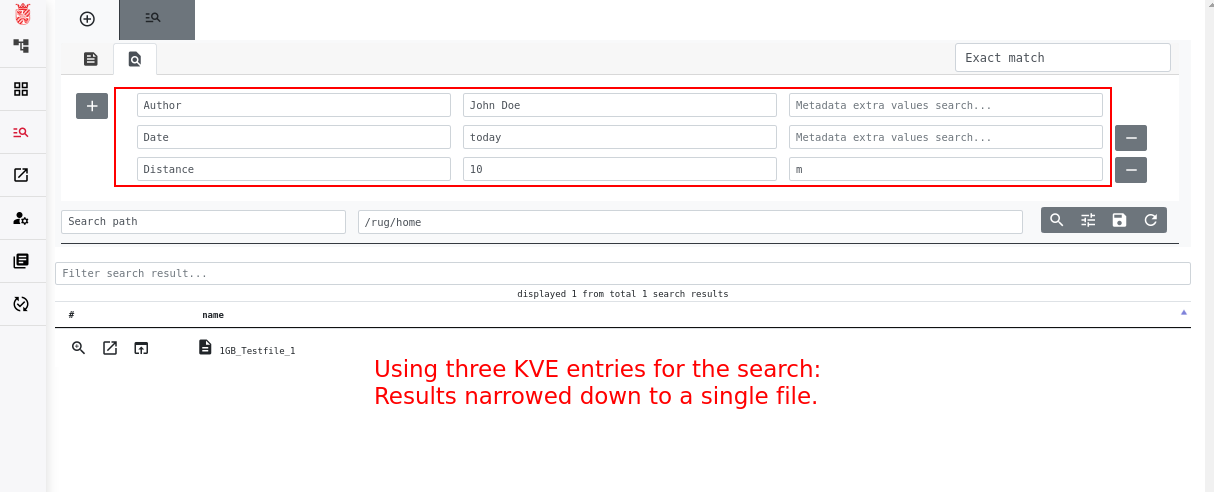
This example is used to properly showcase how to use all the fields in a KVE line and how multiple KVE lines can limit the amount of results you obtain in a given search. Of course, you can use the line and fields however you see most fit to isolate the search results you need.
Notes:
- The function of combining multiple KVE entries to narrow down search results makes the metadata-based search of the RDMS web interface very powerful. This function is especially helpful for cases where there is a lot of data with distinct, but similar metadata entries.
- If you are unsure about what KVE combination is correct for any given line, only input the values that you are sure of. Example: If you search for
Key: "Author", Value: "John Doe", but a file hasCreator: John Doein its metadata, said file will not be found with the given search parameters. You will find the file, however, if you simply search forValue: "John Doe".
Further Tips
Using Fast Search
In addition to the search function explained so far, the RDMS also has a fast search that can be used to make simple searches from any location in the RDMS.
To access the fast search, simply click on the UG logo in the top-left corner of the web interface:
A menu will reveal two fields where you can perform your search. The field on the left allows you to search for a specific RDMS path and open it directly in the browser, the field on the right will instead perform a search of a given term with all the default parameters and open the search window with the results.

Note: Please consider that the fast search will perform an Exact Match search for a term and look for the term in all four fields of the general search window. This function has been developed mainly for users with a long file list to check, that would otherwise have to wait for an unreasonably long time for the search results to appear. The fast search is thus not a "fast access to the search function", but rather a "search performed fast". If you do not have long waiting times when performing searches, it is better to navigate to the search window and perform a search as described in the previous sections to obtain more meaningful results.
More Advanced Search Syntax
The examples above showed how to find files and folders based on different parameters (name, metadata, etc.). It was also shown that search criteria can be adjusted via the available menu to fine-tune search results, we will elaborate here advanced search syntax for further customization.
When you specify a search term in the field, it is important to know that you can also use additional wildcard characters in your query. These wildcard characters are:
_: The underscore is the wildcard for one character. So searching for "Device_-Data" will find results for "DeviceA-Data", "DeviceB-Data", and so on, but not for "DeviceXXX-Data".%: The percentage sign is the wildcard for an undefined number of characters. So searching for "Device%-Data" will find the same results as described for "Device_-Data", but additionally also "DeviceXXX-Data".
Note that these wildcard characters can also be used for the search based on metadata.
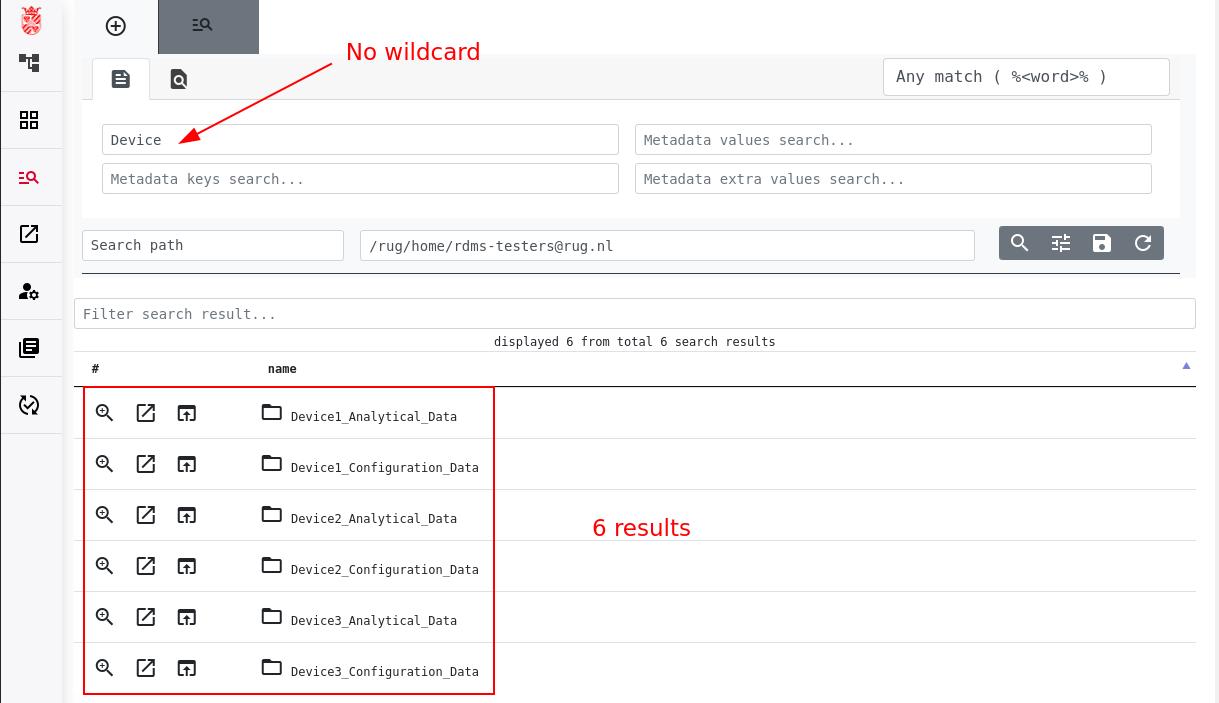
To see how you can use these wildcards for further filtering of your query, take a look at this example where we first searched for "Device". This search yielded six similarly named folders, each with slight variations:
Assuming that we now just want to find the configuration data for all devices 1-3, we could use a search term like "Device%_Configuration_Data" which will yield:

As we used the % wildcard character in this example, this would also find results like "Device312_Configuration_Data" or "DeviceBuilding4_Configuration_Data".
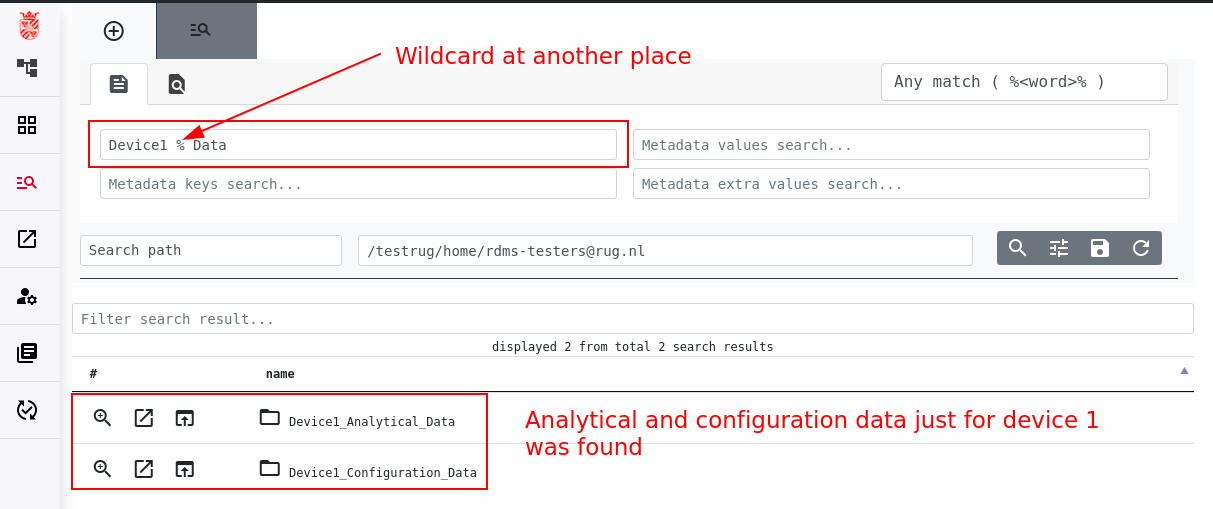
In another example, suppose we want to find both the analytical and configuration data folders for "Device1", but we do not want results for the other devices. This could be achieved with a query of the form "Device1_%_Data" as seen here:
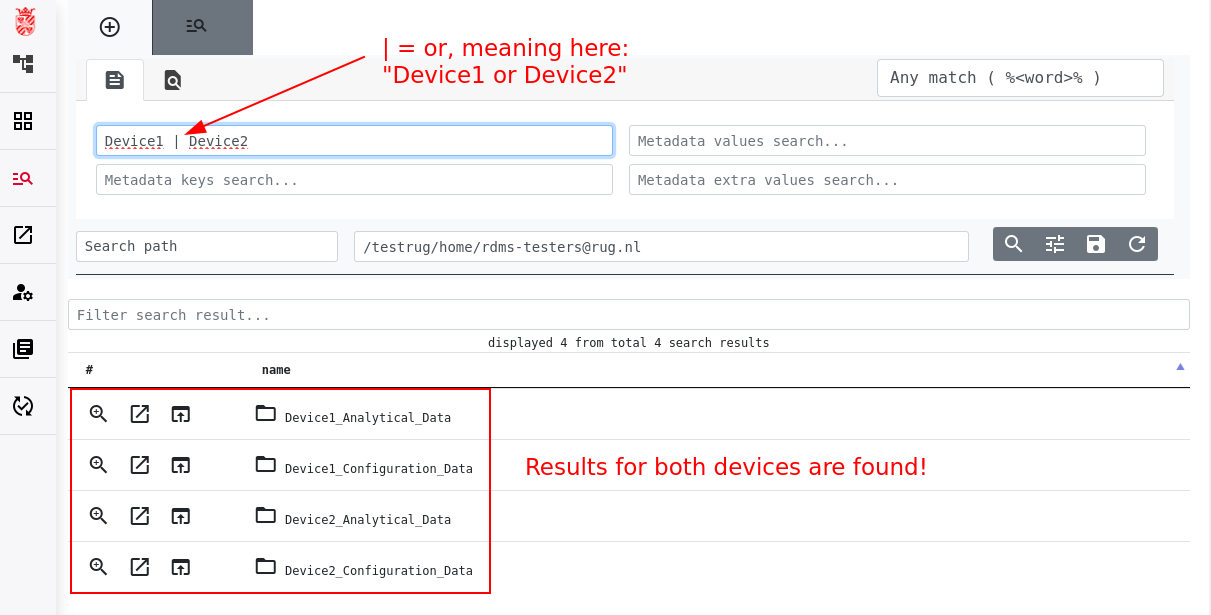
In addition to the wildcard characters, it is also possible to use & and | in the search, which act as "and" and "or" operators, respectively.
Let's assume that you want to find results that contain either "Device1" or "Device2" in their name. A search query for this can use the "or" statement to connect both terms like "Device1 | Device2" which will yield:
Note:
As seen above, you can use wildcards to further fine-tune your search results. With other settings that are available in the search interface together with the possibility to use metadata, these advanced search techniques offer a lot of capability to obtain precise results tailored to your specific requirements.
Filtering Your Search Results
In some cases, your search parameters might return a pool of results that is too large to find what you are looking for. As shown in the figure below, the RDMS Web interface also warns you when the number of results exceeds 10.000:
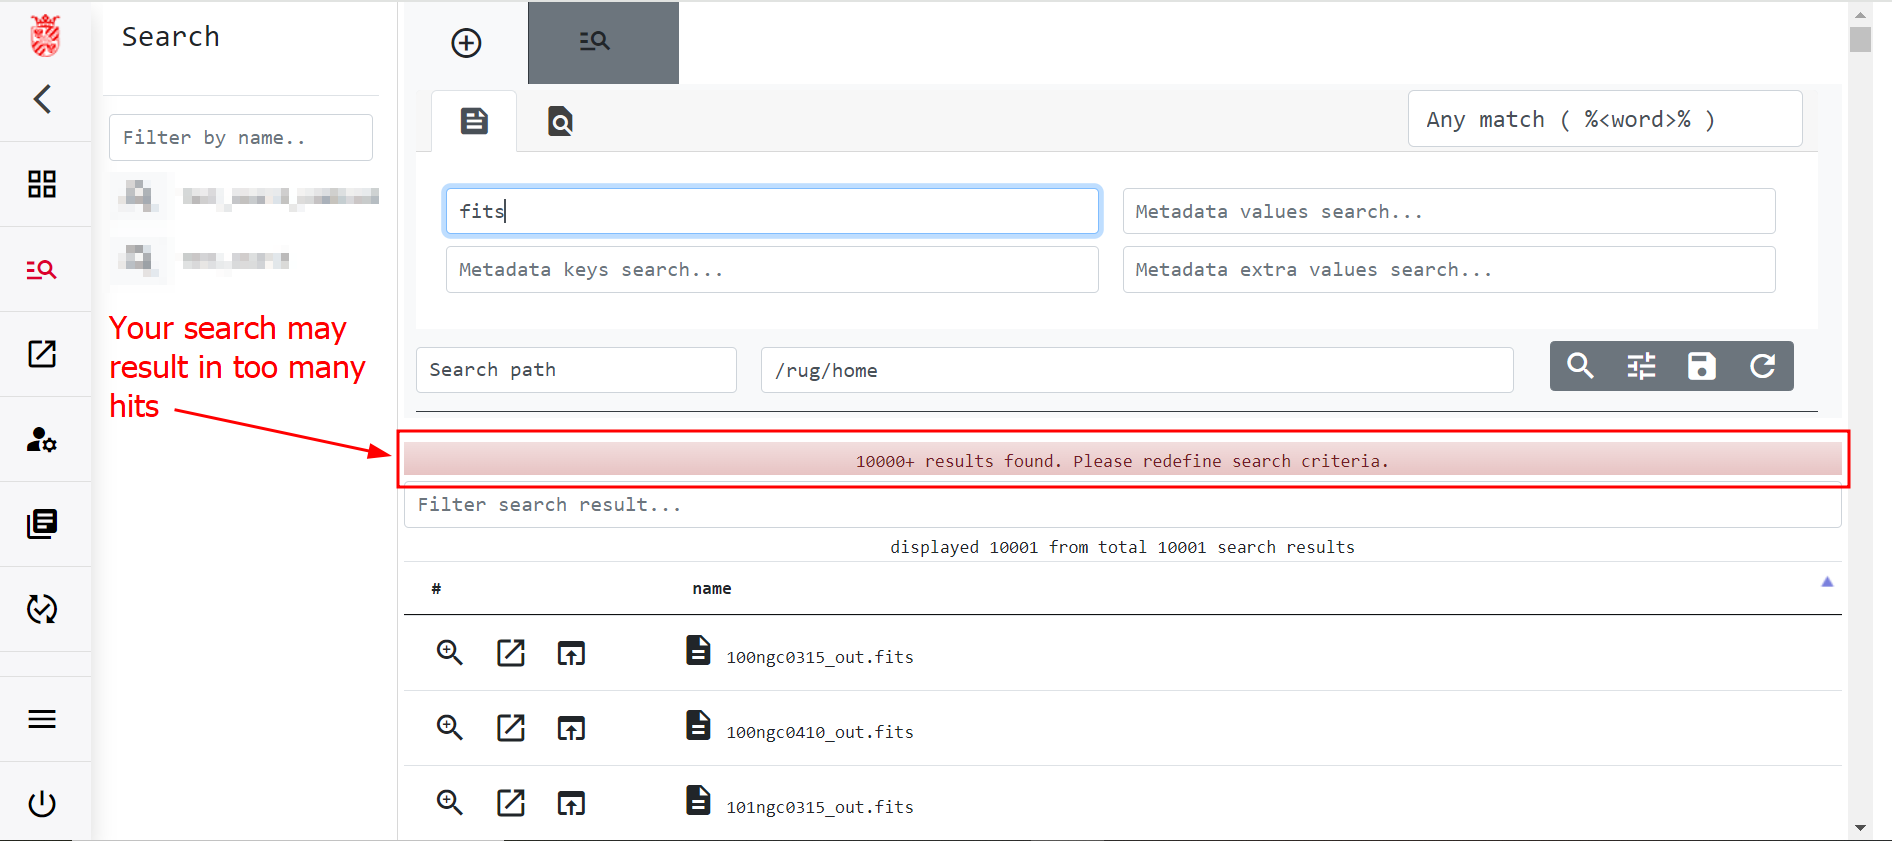
To fix this, you might want to redefine your search parameters, as the Web interface suggests. However, this can sometimes result in having to wait a long time for a search to run again. Alternatively, you might want to filter the results you have already obtained. To do so, type an additional keyword in the bar highlighted by the red box in the figure below.
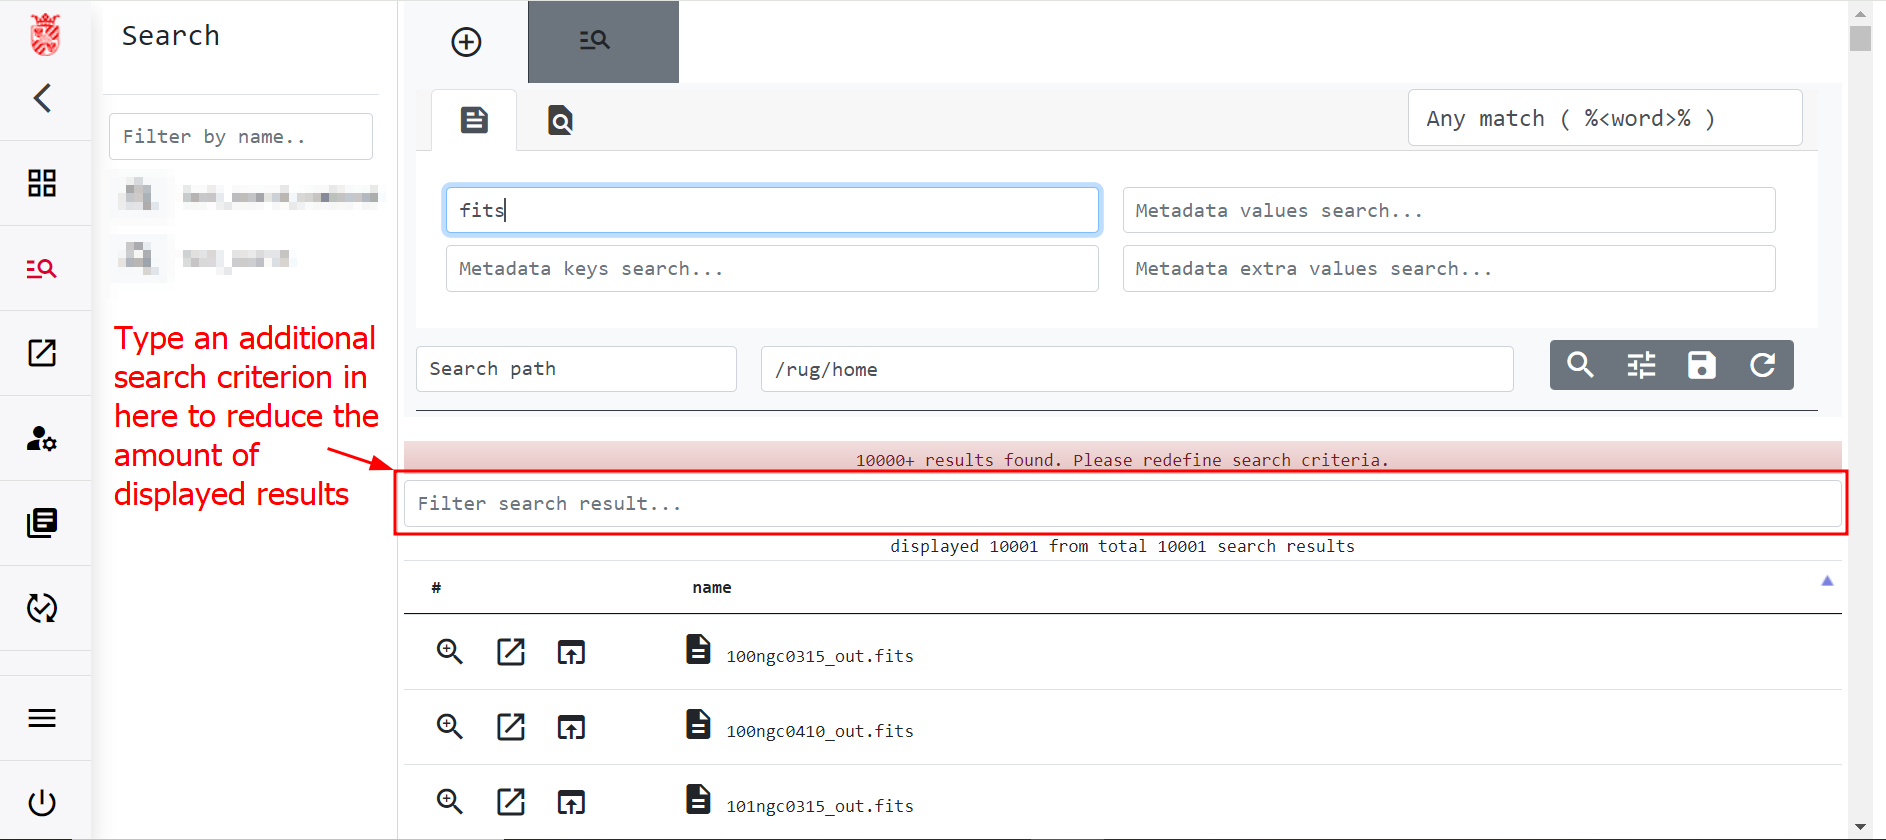
With the new keyword added, the RDMS Web interface will show you only the results which contain the keyword. Thus you can reduce the amount of displayed results without running a new search. The figure below shows what the filtering looks like.

Note: You are filtering the results rather than redefining the search parameters. This means that should you save the search and run it again, you might encounter too many results again. Each time you run that specific search, you will need to manually filter the results. We recommend that for frequently performed searches, you redefine the parameters once you have identified the optimal keyword combination through filtering.
Exporting Search Results (Report Generation)
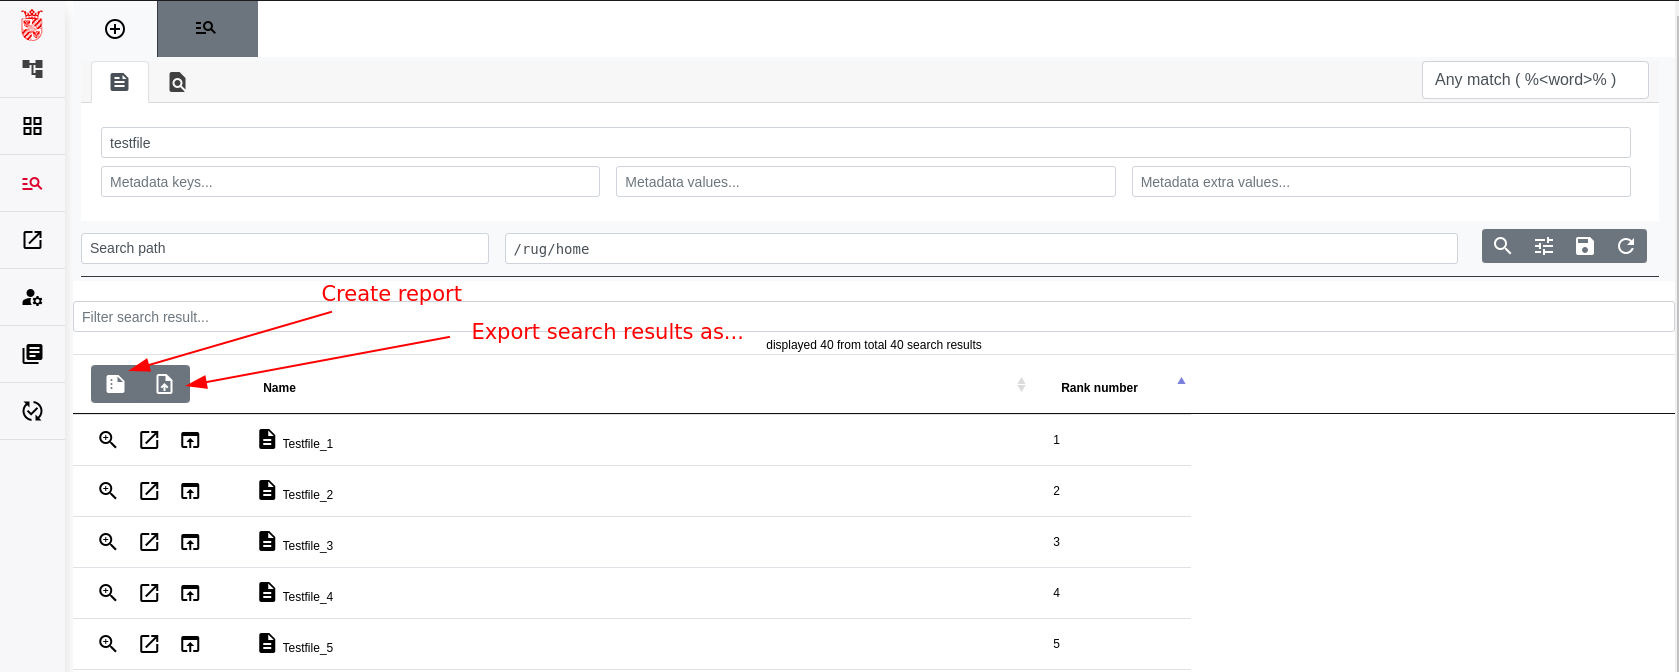
The RDMS also comes with in-built functionality to export search results in formats suitable for report.
To do so, first execute your search. Once the search results are displayed, you can select one of the available report functions:
- Create report: This function creates a set of JSON files containing the search results. From these files, you can then create the final report.
- Export search results as…: This function directly exports the search results in a presentable format that you can choose (currently *.csv)
Using the Create Report Function
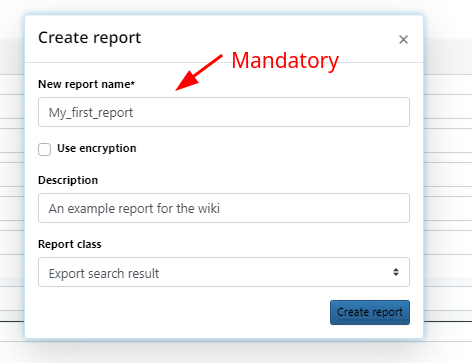
If you select "Create report", a dialog window will open. Here you can specify a name for your report and select if the intermediately created JSON files should be encrypted. Since the JSON file also contains the metadata of the search results, along with your search parameters, you might want to choose to encrypt it to protect potentially sensitive information.
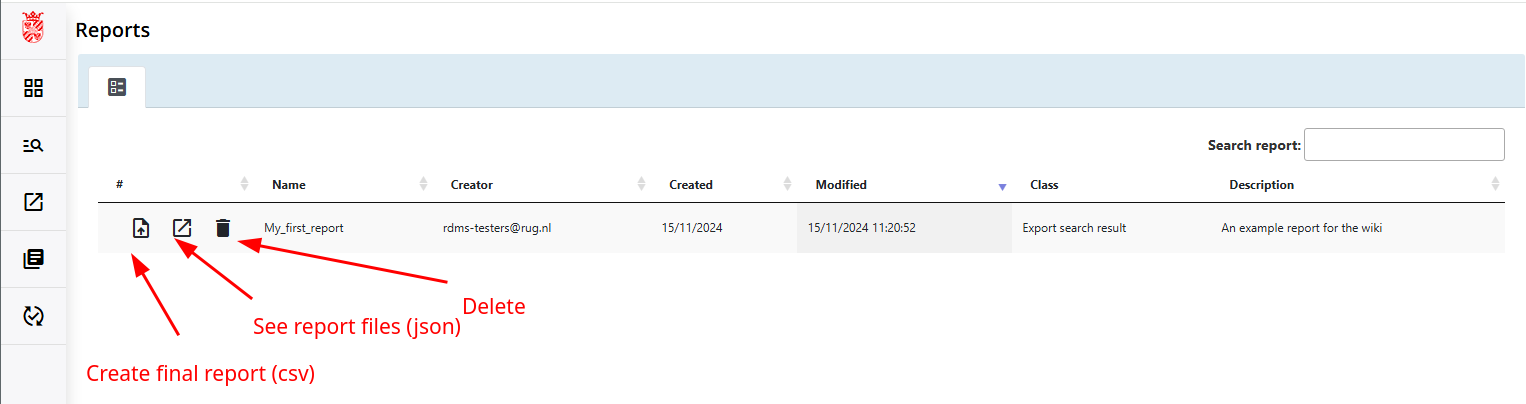
After confirmation, you can find your report by selecting the report button (![]() ) from the left navigation bar. From within the report view, you can now select to either create your final report in CSV format, view/download the JSON files containing your search results/parameters, or to delete one or more reports.
) from the left navigation bar. From within the report view, you can now select to either create your final report in CSV format, view/download the JSON files containing your search results/parameters, or to delete one or more reports.
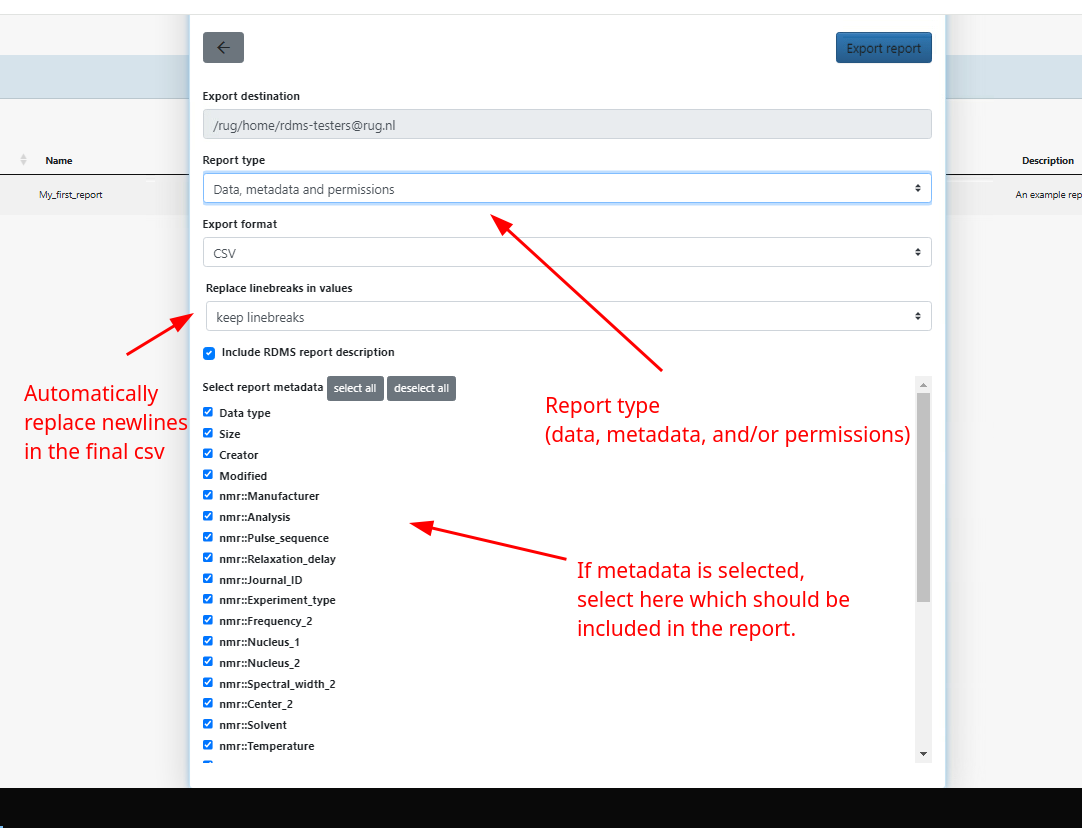
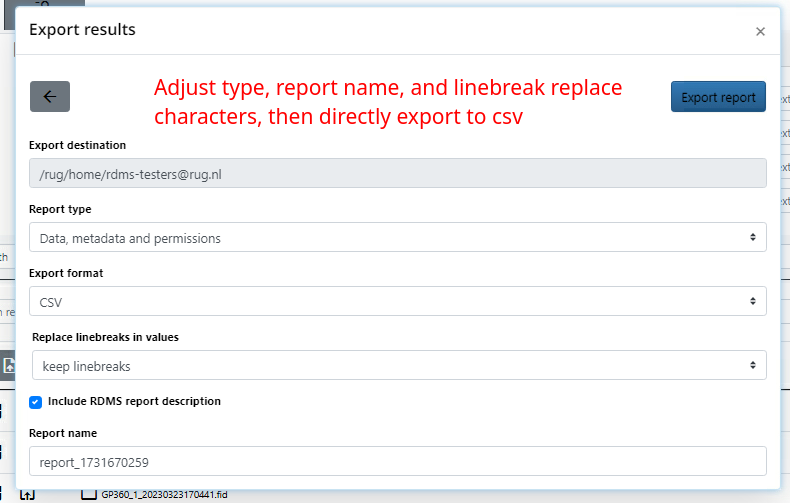
If you select the option to create your final report for export, a new window will open. The first option in that window will ask you for the place to save your report file. That location is where you will be able to retrieve the final report from. The rest of the window asks you to select which part of the results you want to be included in the report (data, metadata, and/or permissions).
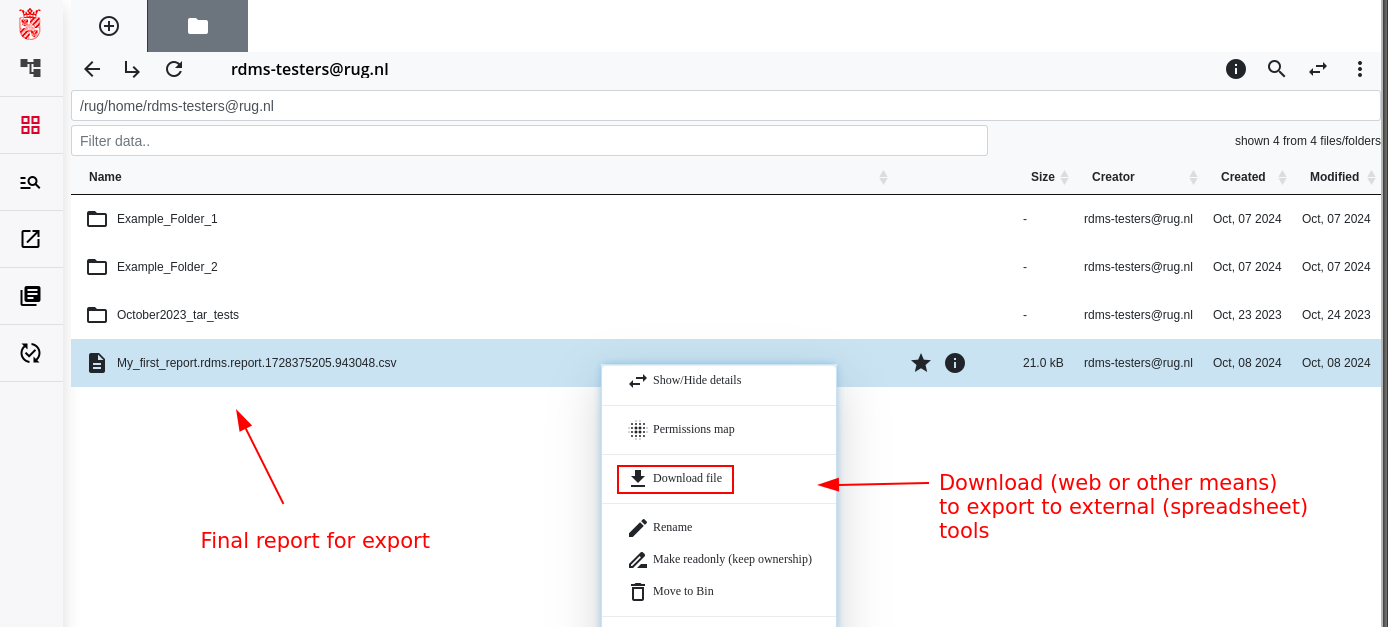
After confirmation, you can download your report in CSV format from the specified RDMS location.
Notes:
- While it is not mandatory to select encryption for the created JSON files with your search results/parameters, it should be done if exported results contain sensitive data. Also in other cases, having encryption selected is recommended as good practice.
- If you did not have any user-defined metadata, there will still be a set of system defined metadata which are added by default ("Data type", "Size", "Creator", "Modified").
Using Export Search Results As Function
The "Export search results as…" function allows you to directly create an exportable CSV from your search results. If you select this option from the search view, you will be asked where your exportable CSV should be saved. Afterwards, you are asked to select the export type (data, metadata and/or permissions), and to specify a name for your export (a default value is automatically filled in).
Afterwards, you can download your report in CSV format from the selected RDMS location.
Notes:
- The "Export search results as…" function is a shortcut way to generate an exportable CSV of your search results, and as such, it does not allow you to directly select which metadata to extract if metadata is included in your report. Instead all metadata is exported by default.
- Choosing the "Export search results as…" function will also create JSON files in the background. These files contain your search results and parameters. You can access them via the report button (
 ) in the left navigation bar. By doing so, you can create further reports from these intermediate JSON files, and you can fine-tune the export parameters (e.g. which metadata to include in the CSV).
 - The "Export search results as…" will automatically use encryption for the intermediate JSON files that are created.
Importing Report Files in Spreadsheet Tools
The exported CSV reports can be important in spreadsheet tools (e.g. MS Excel, LibreOffice) for visualization and further processing.
It is important to note that the CSV reports in the RDMS use tab as field delimiter!
Please be sure that you select this during import in your spreadsheet tool as it will otherwise break the formatting of your import.
Also note that RDMS metadata fields can be multi-line fields. In cases where this causes problem when exporting the CSV to another tool and where it is desired for other reasons, it is possible to automatically replace newlines in the exported CSV. To do so, simply select a replace character during report creation.